Planogram Rules
Planogram rules allow you to insert a general planogram rule into the planogram template that specifies a group of products from which Quant then selects the products to be placed in the final planogram. This is a very efficient and fast way to create a planogram that will be optimized according to sales data. From each inserted rule, Quant selects the best products and places them according to space and sales in the planogram.
In this manual you will learn:
- How to sort products into groups according to selected attributes so you can easily insert them into the planogram as rules?
- How to insert a planogram rule into a planogram template?
- How does Quant select products from a planogram rule to place in a planogram?
- How can you manually change the order of products in the planogram or force the placement of a specific products?
- What properties can you set for a planogram rule?
- How do you join multiple planogram rules together using enclosure?
Planogram rules only work for optimized planograms.
Optimized planogram
Optimized planograms are described in greater detail in the manuals in the Optimized Planograms section.
Product Groups
On the Product Groups tab, you can sort products into groups according to the attribute (or more attributes) you select. You can create groups by brand, supplier or some subgroup.
Let's demonstrate this on the example of the Drinks category, where we have a total of 4 fixtures and we want to put drinks of similar type together (Ice tea, Sparkling water, Still water, Juices). Thus we will divide the Product Groups table by the Group 2 Name attribute, which identifies these product groups.
- In the Product Groups tab, click on the filter icon.
- In the new window, select the attribute by which you want to create product groups (in this case it is the Group 2 Name attribute).
- Products are grouped according to this attribute. You will see these groups in the table on the left.
- If you select one of the groups, you will see all products of the selected group in the right table.
Filter in Product Groups
Product Groups
Planogram Rules
How to insert a planogram rule into a planogram template?
The easiest way to insert a planogram rule into a planogram template is by using the groups created in the Product Groups tab.
- In the Product Groups tab, select the group you want to insert into the template.
- In the toolbar on the left, activate the Insert Rule to Template tool or press the G on your keyboard.
- Click in the template to place the rule.
- Press the ESC key to end the insertion.
Insert Rule to Template
You can then stretch the rule over several rows of the planogram template, depending on how many shelves you want to place products from a given product group. For example, if you want the products from the inserted group to be placed over the first 3 shelves, you need to stretch the rule over the first 3 rows of the template.
Stretching the rule
You can edit the properties of the inserted rule on the right in the Component tab. In the Product Filter row, you can see the created rule for selecting products. You can further modify the condition here, e.g. by adding an additional condition to select products only from a specific supplier.
Product Filter
If you activate the Insert Rule to Template tool without selecting a product group on the Product Groups tab, an empty rule is inserted into the template for which you must set a condition in the Product Filter property in the Component tab.
Product Selection Logic
Quant always inserts only products matching the product filter for the rule into the planogram. It selects products according to the replenishment criteria settings in the Template tab. Because it is an optimized planogram, you can be sure that the best products are always placed and the number of placed items will match the sales.
Important criteria to set are:
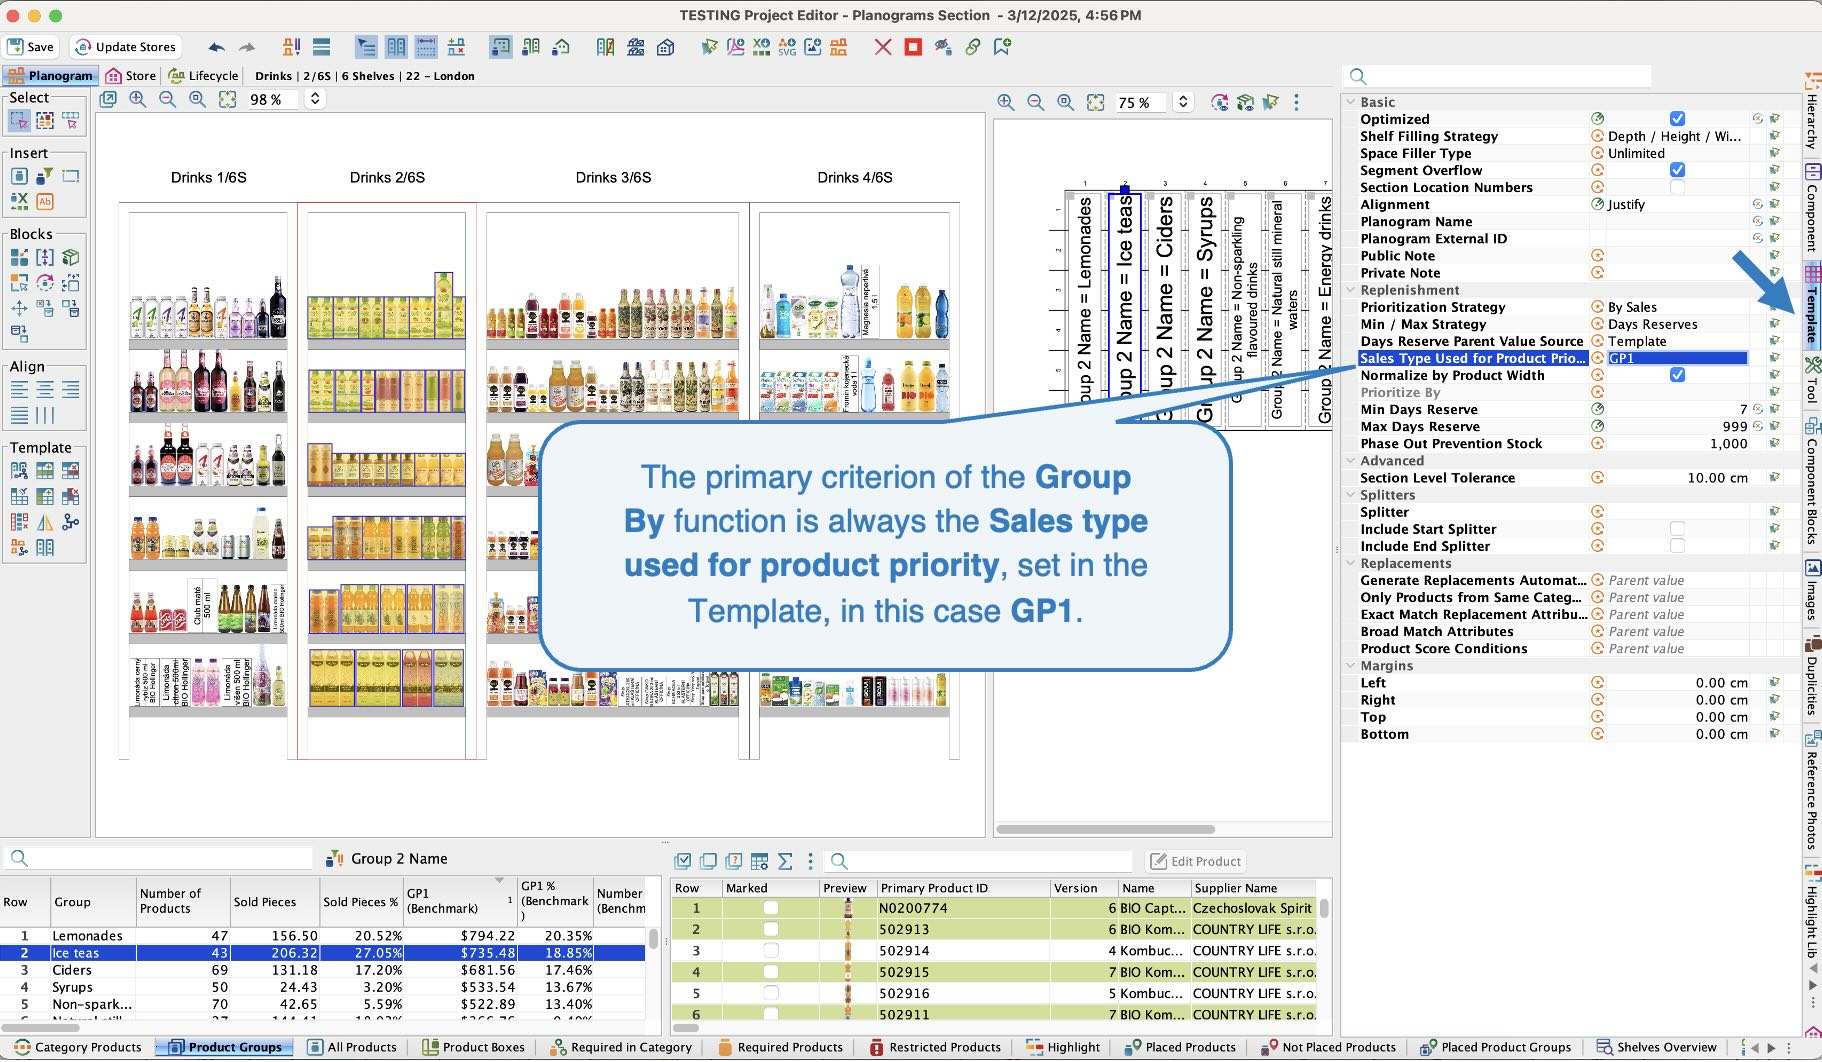
- Sales Type Used for Product Priority: According to the sales indicator selected here, Quant determines the placement priority. For example, if you select GP1 here, it means that products with a higher GP1 will have a higher placement priority in the resulting planogram.
- Min Days Reserve: The minimum number of days that the stock of products placed in the planogram must last. If the Minimum Days Reserve is set to 7, this means that the planogram should have enough of products to last at least one week. The number of pieces corresponding to the minimum days reserve in Quant is called MIN. If the average daily movement of a product is 2 pieces, in our example MIN = 7*2 = 14 pieces.
- Max Days Reserve: Indicates the maximum number of days for which we can have enough product stock corresponding to the location of all the packages scheduled in the planogram. The quantity of units corresponding to the maximum days reserve in Quant is called MAX. If the maximum days reserve is set to 21 and the average daily product movement is 2 pieces, we calculate MAX = 21*2 = 42 pieces.
Setting up an optimized planogram is described in more detail in the Setting up replenishment criteria manual.
Whether or not a product is placed in a planogram is also affected by the priority level.
Products that have an Optional priority level will not be placed if not a single unit is sold in the maximum number of days (maximum days reserve). The Required Priority Level means that products must be placed in the planogram, but the number of placed pieces will depend on their sales. Blocks with a Fixed Priority Level in the planogram respect the package quantity limits set in the Component tab, regardless of their sales.
For a detailed explanation of priority levels, see the Setting of Priority Levels manual.
Quant inserts products into the planogram in the order from the best product according to the Sales Type Used for Product Priority you set (in this case GP1). Quant inserts the product with the highest GP1 first, then the second highest GP1, and so on. The number of units placed for each product with Optional and Required priority levels is affected by the number of sold pieces (the higher the number of sold pieces, the higher the number of units placed for that product).
Replenishment Criteria
The list of products matching the filter for the set rule can always be found at the bottom of the Component tab. Red products are products that are not placed in the planogram.
Product Table
In this table you can change the order of the inserted products using the arrows or the Move button.
Changing the Order 1
Changing the Order 2
You can also force the placement of a product that has not been placed due to low sales by increasing its priority level.
Not placed product
Changing the Priority Level
Setting Properties in the Component Tab
If you select a rule in the template, you can edit the properties for the entire rule (all products in the planogram included under this rule) in the Component tab.
For example, you can set the minimum or maximum placed pieces in width, height or depth for all products included in the rule, or change the priority level for all products within the rule.
Component Tab for a rule
However, if you select a specific product in the planogram or in the bottom table on the Component tab, you can then edit the properties only for that product.
Component tab for a product
Several specific properties affecting the behavior of the rule as a whole can be set. These properties can be found on the Component tab in the Rule section if you have a rule selected in the template.
Layout
Influences how products should be distributed within the planogram.
- Flexible: The products are freely distributed in the planogram according to space and do not hold any specific shape. They may have more space on one shelf and less on another.
Flexible layout
- Rectangular: The products keep a rectangular shape within the planogram and thus have the same space on each shelf. They form vertical rectangular blocks.
Rectangular layout
Alignment
For the Rectangular layout, you can set the alignment of the products within the rectangle.
Alignment
Only Category Products
- If the box is checked, only products from the category assigned to the planogram will be added to the planogram.
- If the box is unchecked, also products that aren't from the category assigned to the planogram will be added to the planogram.
Product Filter
Set the conditions to specify which products should fall under the inserted planogram rule. If you insert a rule from the Product Groups tab, the Product Filter will automatically pre-fill according to the inserted group. You can then add another condition or modify the condition if you need to.
You put the Lemonade group in the planogram. However, the first two shelves are higher than the next 4 shelves. To prevent some products from not being placed because of their height, as Quant might try to place them in the lower shelves, we recommend splitting this rule into 2, adding one more condition into each limiting the height of the products.
Product Filter
Products
Here, you can select specific products from the list. It is possible to combine the product filter with the product selection in the Product properties if you need to include some products which do not meet the rule condition.
Products
Group By
In this section, you define the rules for organizing products in the planogram. This function allows you to arrange products according to a selected attribute, with sales type as the main criterion, defining product priority as specified in the template. For example, if you want to group products by supplier based on profit (GP1), select the Supplier attribute in the Group By row. Once confirmed, Quant automatically groups the products by supplier starting with the one whose products generate the highest profit, and descending to those with lower profit. You can also apply multiple grouping rules simultaneously, such as Group By Supplier and Group By Brand.
Group By
The primary criterion of the Group By function is always the Sales type used for product priority, set in the Template.
 Criterion of the Group By functionSort By
Unlike the Group By function, the Sort By function is not based on sales. Products are sorted solely by the selected attribute, regardless of sales performance. Products can be sorted alphabetically ( e.g. by supplier or brand) or by size (ascending or descending - e.g. by height or price).
Sort By
It is possible to combine both functions Group By and Sort By. The Group By function defines the main grouping structure based on sales and the Sort By function determines the order within these groups. For example, if you want to group products by Supplier based on sales and then sort them by Price (from highest to lowest), select the Supplier attribute in the Group By row (which will group products by supplier, based on their sales) and then select the Price attribute in the Sort By row (which will arrange products from most expensive to least expensive within each group).
Sorting strategy
If you select one or more properties by which products should be grouped or sorted in the planogram, they will be added in a defined order based on this property. They can be arranged in several directions:
- Snake Right Down: Products are placed from left to right on the top shelf, then continue on the lower shelf from right to left, forming a downward snake pattern.
- Snake Right Up: Products are placed from left to right on the bottom shelf, then continue on the upper shelf from right to left, forming an upward snake pattern.
- Snake Left Down: Products are placed from right to left on the top shelf, then continue on the lower shelf from left to right, forming a downward snake pattern.
- Snake Left Up: Products are placed from right to left on the bottom shelf, then continue on the upper shelf from left to right, forming an upward snake pattern.
- Right Down: Products are placed from left to right on each shelf, and once they reach the end, they move to the lower shelf and continue in the same direction.
- Right Up: Products are placed from left to right on the bottom shelf, then continue on the upper shelf in the same direction until they reach the top of the fixture.
- Left Down: Products are placed from right to left, starting from the top shelf and moving down to the base of the fixture.
- Left Up: Products are placed from right to left, starting from the bottom shelf and moving up to the top of the fixture.
- Top to Bottom: Products are sorted in columns from top to bottom, starting at the top left and continuing downward before moving to the next column.
- Vertical Blocks: This is a sorting strategy in which the product placed on the top shelf is duplicated on all shelves directly below it.
Sorting Strategy
Max Products
This is the maximum number of products that can be placed in a given planogram rule. You can thus limit the number of products placed in cases where a given rule includes many products with high sales, but you want only the top 20 products to be placed, for example.
Max Relative Width
Here you can set what percentage of the total planogram (section) width can be occupied by products from the rule. This is a percentage setting, so it will work proportionally on all branches regardless of the total space.
If the section is 4 meters wide and we set Max Relative Width to 10%, the products of the rule must not exceed 40 cm of the width of the section. However, the products should be spread evenly on all shelves over which the rule is placed.
Max Space
Here you can set what percentage of the total width of all shelves in planogram (section) can be occupied by products from the rule.
If a given section has a total width of 4 meters and each planogram has 6 shelves, the total linear space is 4*6=24 m. If we set the Max Space to 10% it means that the sum of linear meters taken by the products in the rule must not exceed 2.4 m. But here it does not matter how the products will be distributed in the shelves. For example, in the first shelf the products from this rule can take up 1 meter, in the second also 1 meter and in the third 40 cm.
Max products and Max Relative Width
Enclosure
If you have inserted several rules that you want to be aligned and behave as one rectangular block, use the Insert Blocks Enclosure function.
Example without Enclosure
Example with Enclosure
You can set some properties for the blocks inside the enclosure on the Component tab:
- Alignment: This is the alignment of products within the enclosure.
- Max Relative Width: Here you can set what percentage of the total planogram (section) width can be occupied by products from a rules that fall under a given enclosure.
- Max Space: Here you can set what percentage of the total width of all planogram (section) shelves can be occupied by products from the given rules that are part of the enclosure.
- Outline Color: Here you can set the color of the enclosure in the planogram template.
Enclosure properties