Fixtures in Stores
In the Fixtures in Stores section you can see an overview of all the fixtures that are placed in the stores. This is a very useful report that allows you to see what fixtures are placed in which stores and to monitor the fixture properties such as its dimensions, shelf orientation, fixture type or category.
You can find an overview of store fixtures in the Quant Explorer in the Fixtures in Stores section.
First, set the report criteria and then press the Report button.
Fixtures in Stores
What can you find in the Fixtures in Stores section?
- In which stores is the selected fixture type located?
- In which stores are the fixtures with the selected category located?
- What are the dimensions of the placed fixture?
- What is the number of shelves of placed fixtures?
- Which fixtures have been placed on the floor plan in the past at a selected time?
- a others...
Criteria
Name
Fill in the name of the criteria in case you want to save them to your library.
Access
Here you can set which users can edit or see the criteria and then use them if you save them to the library.
All Fixture Types / Fixture Type
If the box is checked, all fixture types will be displayed in the report. If the box is unchecked, you can then select in the Fixture Type field which specific fixture type you want to analyze.
All Fixture Types / Fixture type
All Floor Plan Layers / Floor Plan Layers
If checked, the report will display fixtures from all layers of the floor plan. If the box is not checked, you can then select which floor plan layers you want to take into account in the report in the Floor Plan Layers field.
All Floor Plan Layers / Floor Plan Layers
Floor Plan Date
Here you can set the date which you want to analyze the floor plan. By default, today's date is always selected, but if you need to see, for example, what fixtures were placed on the floor plan in the past, just fill in a date here.
Floor Plan Date
Level of Normalized Category
Fixtures in a floor plan may have different levels of categories assigned to them, but sometimes we want to see categories from the same level when we analyze them. You can achieve this by setting the Normalized Category Level criterion. It determines what category level to display in the Normalized Category IDs and Normalized Categories columns.
All Categories / Categories
If the box is checked, all fixtures will be displayed in the report regardless of the category assigned to it. If the box is unchecked, you can then set in the Categories field which specific categories you want to analyze. The report will then show only the fixtures with the categories selected here.
All Shelf Counts / Number of Shelves With Category
This setting only works if the All Categories checkbox is unchecked and you have selected specific categories in the Categories row. It will then allow you to filter only fixtures that have the number of shelves you specified for the selected category.
We want to see all fixtures with the category Drinks, which has a total of 3 shelves with this category. In the Categories row we select the category Drinks, uncheck the box All Shelf Counts and in the Number of Shelves With Category row we set 3. Then the report will show us both fixtures with the category Drinks, which have a total of 3 shelves, and fixtures that have e.g. 6 shelves, but only 3 shelves are set to the category Drinks and the other three e.g. the category Wine.
Category and Shelf Counts
Library
You can save the criteria to the library in the bottom left part so that you can retrieve them from the library later. It's up to you whether you save the criteria for yourself only, or whether you enable it for other users in desktop access so that they can use the criteria from the library and not have to set up the report themselves.
Library
Report Interpretation
Each row in the table represents one fixture at one particular store. Each column represents one property (fixture or store property).
Of course, you can modify the table as you wish - add columns, delete columns, set the correct order of columns.
You can read more in the Working with Tables manual.
You can then save your table settings to the table settings browser so that you can retrieve them from the library later without having to set up the table again.
You can read more in the Table Settings Browser manual.
Table SettingsUsing filters, you can filter fixtures from one specific store or fixtures with a certain category, a certain number of shelves or a certain shelf length.
Filters
Other functions
Show in Store
If you select a fixture row in the table and click Show in Store button, you will be redirected to the store where the fixture is located. The fixture is also marked in the floor plan so you can quickly and easily see which fixture it is and where it is located in the store.
Show in Store
New Type from Selection
Use this button to create a Fixture Type from the selected fixture.
When you created your first store, you designed all the fixtures in the Store Editor. Now you would like to have these fixtures stored in your library so that you can easily add them to other stores. In this case, just find the fixture from which you want to create a fixture type in the Fixtures in Stores report and click the New Type from Selection button. Then fill in the name in the Fixture Editor and click the Save button.
New Type from Selection
Fixture Type
The fixture types are described in more detail in the Fixture Types manual.
Custom Properties
Click on the Custom Properties button to open the window custom properties for the fixtures, where you can, for example, create a new property.
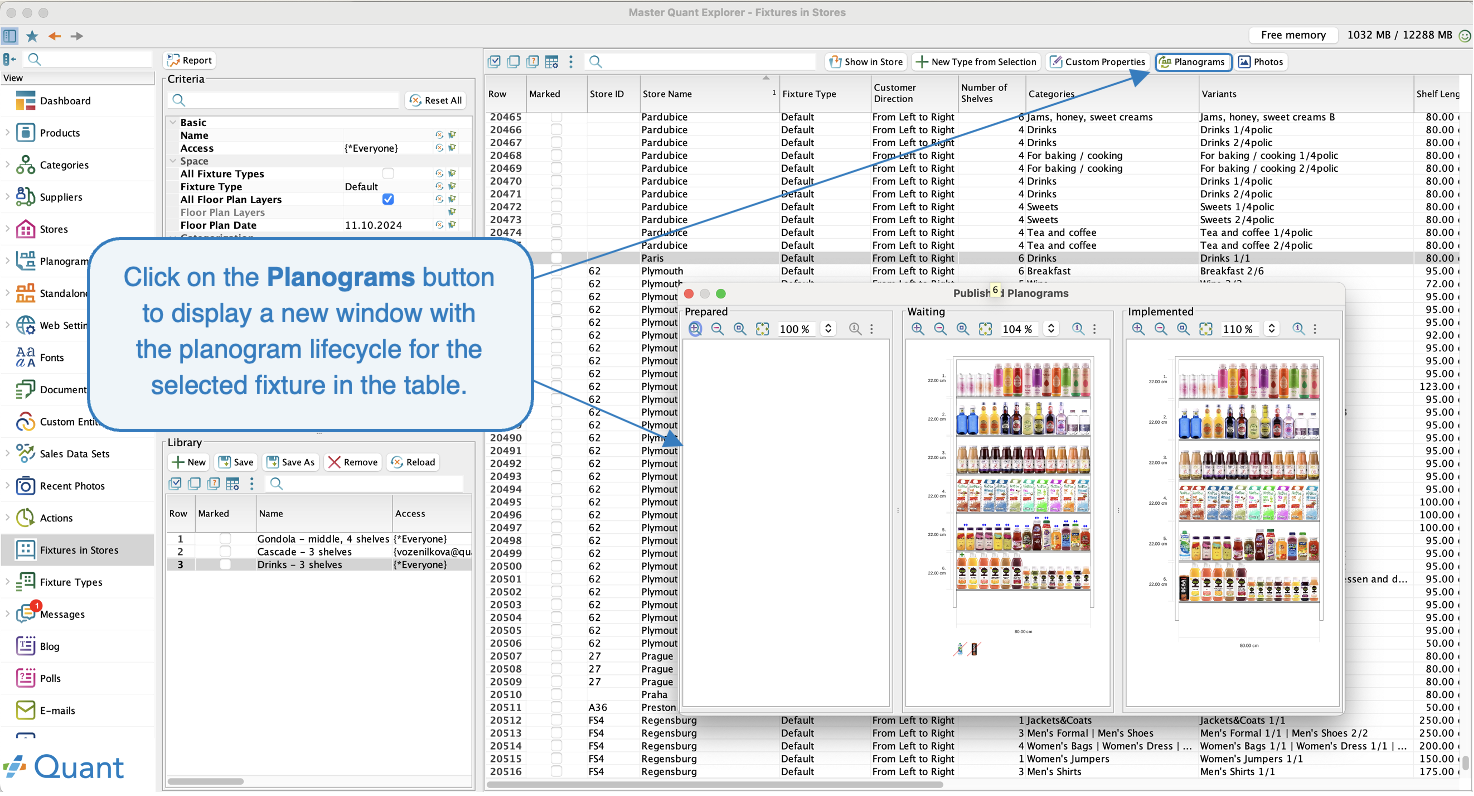
Planograms
Click the Planograms button to open a window where you can follow the planogram lifecycle for the selected fixture.
 PlanogramsPhotos
Click on the Photos button to open a new window with an overview of all uploaded photos for the fixture.
Photos
Edit Marked
This tool is used for bulk editing of marked fixtures in a table.
First, you must filter the fixtures in the table that you want to edit in bulk. Then you select these fixtures and click on the Edit Marked button. In the new window, you select the bulk action you want to perform.
Edit Marked
Edit Marked - Edit Properties
What bulk actions can you perform?
- Edit Properties: Allows you to edit general fixture properties that are set in the Store Editor on the Component/Fixture tab.
- Edit Shelves: Allows you to edit the shelf properties that are set in the Store Editor on the Component / Shelf, Blocker or Pictogram tab. Use this tool to add or remove shelves on all marked fixtures.
- Change Category Variant: Allows you to bulk change the category variant for marked fixtures to a new variant.
- Change Category Variant Suffix: Allows you to change the category variant suffix in bulk.
- Change Fixture Type: Here you can change the fixture type in bulk.
- Edit Pictograms: Allows you to set or remove pictograms on marked fixtures.
- Duplicate in Layer: Allows you to copy the selected fixtures to the layer you select in the next step. The fixtures will therefore remain in the original layer.
- Move to Layer: Allows you to move the marked fixtures to the layer you select in the next step. The fixtures are removed from the original layer and moved to the layer you selected.
- Remove from Store: This option removes the marked fixtures from the store.
All bulk actions are described more in detail in Bulk Editing of Fixtures manual.