Floor Plan Highlight
Using floorplan highlights, you can display various information on the fixtures in the floorplan of the store, such as categories, space or sales share of categories, fixture or shelf properties, and more. At the same time, you can set different floorplan highlights for different user groups.
Where can you find the floorplan highlights?
The Highlight Library can be found in the right-hand bar of the Store Editor. The Highlight settings are located in the bottom bar.
Highlight Library
Highlight Settings
The Highlight tab is divided into several sections:
- Highlight Properties - here you can set the overall appearance of the highlight, access rights, and default display for selected users.
- Highlight
- Highlight List - an overview of all possible highlights.
- Active Highlight - the highlight you select from the list on the left and apply to the floorplan.
- Highlight Details - when you select a property in the Active Highlight section, you can then make additional settings for that specific property in this section, e.g., which properties to display and in what order, text or border color, etc.
Highlight Settings
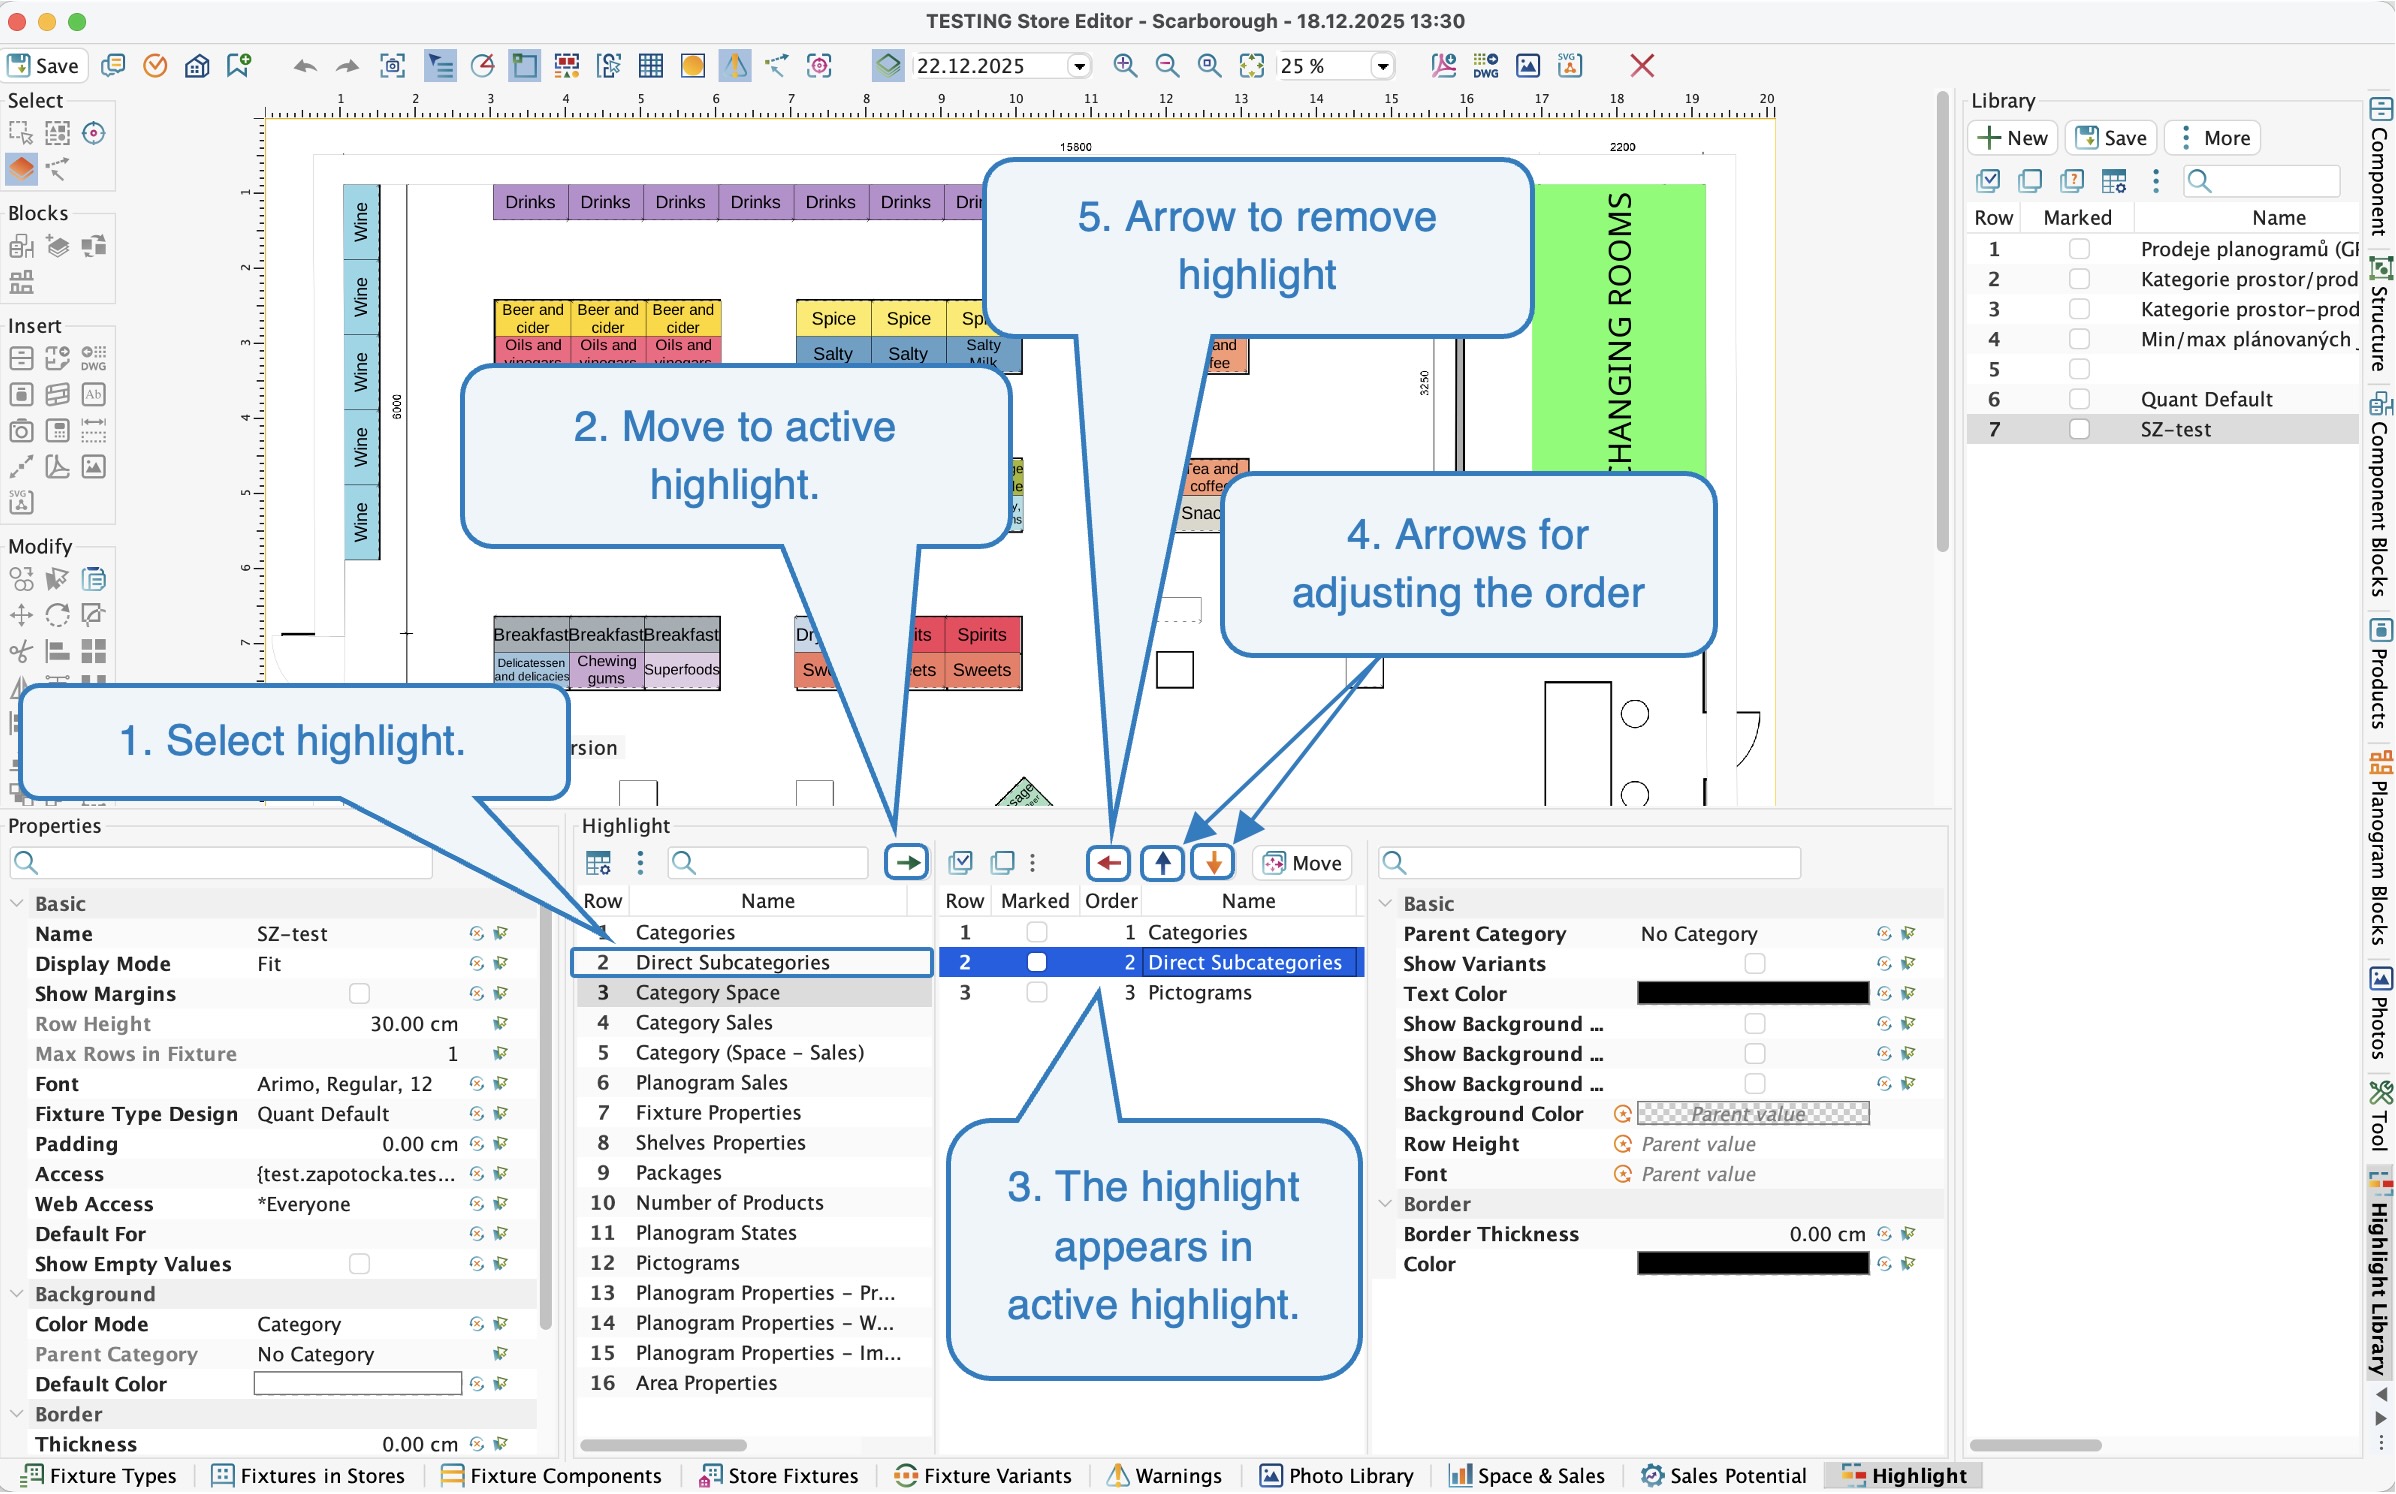
How do you add properties to a highlight?
- Select the highlight you want to add.
- To add it to the active highlights, click on the green arrow or double-click on the attribute.
- The highlight will appear in the Active Highlights section and will be applied.
- If you want to change the order of the active highlights, use the up and down arrows.
- To remove a highlight, click the red arrow or double-click the attribute.
 Highlight settingsHighlight Properties
Basic Highlight settings
These are the basic settings for each highlight. Here you can set:
- Name - enter the name of the highlight. This is important when saving the highlight to the library, where the saved highlights are then stored.
- Display Mode - offers 3 display options.
- Fit - display directly in individual fixtures in the floorplan. If there is a lot of text or the fixture is too small, the text will not be easily readable.
- Rows - the highlight text will be broken into lines. You can set the Row Height and Max Rows in Fixture = how many lines will be displayed inside the fixture.
- Fixed Font - font with automatic uniform display according to the font size set in the Font line.
Display Mode
- Show Margins - allows you to display the set margins for fixtures that do not have a category set.
- Font - here you can choose from predefined font types, including size and style.
- Access - settings for user groups or individual users who have access to the highlight in the desktop application.
- Web Access - setting for user groups or individual users who have access to the highlight in the web application. To assign this access, only universal attributes must be included in the highlight.
- Default For - here you set for which users or user groups the highlight should be considered the default and will be displayed automatically when viewing the floorplan in the desktop application and on the web. To assign this access, only universal attributes must be included in the highlight.
Universal highlight attribute
- Color mode - determines where the color highlight of fixtures in the floorplan should be taken from. There are 4 options available:
- Category - takes the set color of the category.
- Color mode - determines where the color highlight of fixtures in the floorplan should be taken from. There are 4 options available:
Category Color mode
- Direct Subcategory - Only direct subcategories for the category you select in the Parent Category property will be highlighted in color on the floorplan and will be highlighted with the color of this direct subcategory.
- Fixture - if the fixture has a color set in the Fixture tab, then this color will be displayed. If it is not filled in, then the category color will be displayed.
Fixture Color mode
- None - floorplan displayed without color fills.
- Default Color - Color that is displayed if, for example, the fixture does not have an assigned category or is not a direct subcategory of the selected parent category.
Highlight Types
By selecting individual highlight types, you can customize the display of information on the floorplan. You can freely combine individual types and change their order in the settings. Below is a description of the most commonly used types:
- Category - displays the fixture category on the floorplan.
- Direct Subcategories - select this option if you want to obtain information about the direct subcategories of a specific parent category. On the right side of the highlighting settings, you must select the Parent Category whose subcategories you want to highlight.
In this case, the parent category is Shops, which has direct subcategories such as Chilled and Groceries. Each subcategory can also have its own subcategories. In our example, the yellow fixture has the direct subcategory Groceries and the category Spice.
Categories and Direct Subcategories
- Category Space - This highlight shows the space share occupied by individual categories.
- Category Sales - Shows the sales share of a given category.
- Category (Space-Sales) - This setting shows the difference between the Category Space and the Category Sales.
For these three types of highlights, don't forget to set additional highlight properties on the right in the details, such as Show Values As, where you can set whether you want to see the results as a percentage or as average fixtures or space in meters. In the Data Source attribute, select whether you want to see the values for a specific store or benchmark. Next, set the Space Type attribute for space to determine whether to take into account, for example, the linear space of all shelves, the linear space of the floorplan or the floor area, etc. For sales, set the Value Type you want to analyze (Sold Pieces, GP1, etc.).
You can also view the space and sales share in the Space & Sales analysis.
- Sales Highlight: The Beer and Cider category account for 2.15 % of total sold pieces across all categories.
- Space Highlight: The Beer and Cider category occupies 2.20 % of the floorpan.
- Space - Sales Highlight: The Beer and Cider category deserves 0.05 % less space based on its sold pieces (2.20 - 2.15 = 0.05).
Highlight Space and Sales
- Planogram Sales - This highlight shows the number of sold pieces, margin, and turnover (according to the selected Value Type in the details) for published planograms on the given fixture - more precisely for products that are currently placed on planograms in individual lifecycle states, which can be set in the highlight details in the Planogram States section.
Planogram Sales Highglight
- Fixture Properties - Allows you to view the fixture properties you select on the right in the highlight details in the Fixture Properties row.
Fixture Properties Highlight
- Shelf Properties - Displays the shelves properties that you set on the right in the highlight details in the Shelf Attribute row and lists their individual values. Each shelf will have its value displayed.
Shelves Properties Highlight
- Planogram States - Displays information on whether the planogram is implemented, waiting or prepared.
Highlight Library
You can save your highlight to the library so that you can easily load it later. If you already have a highlight set in the Highlight tab that you want to save, simply go to the Highlight Library tab on the right and click the Save As button.
To create a completely new highlight from scratch, click the New button, then set the highlight as you want to save it to the Library, and then click the Save button.
To apply any of the saved highlights to the floorplan, select the row with this highlight in the library, and it will be immediately applied to the floorplan.
New Highlight
What else you can do with the highlight:
- Save - save the current highlight settings to the library in place of the originally selected highlight, thereby overwriting it with the new one.
- Save As - save the current highlight settings as a new line.
- Delete - delete the selected highlight.
- Select Default - switch to the default highlighting settings.
- Create Bookmark - create a bookmark for the current settings.
Show hidden buttons
Highlights on the Web
On Quant Web, in the Floorplan section, you will see all highlights that are set to be displayed on the web. You can grant viewing rights to a user group or individual users.
Highlight web settings
To assign this access, only the universal attribute must be highlighted.
Highlights are sorted alphabetically for better orientation. The exception is the default setting, which is always at the top of the list.
Highlight Web Settings