Fixture Editing
In the floor plan, you can set different dimensions, numbers of shelves, blockers, hanging system and more. Therefore, you can set exactly the look which will match with the fixture in the store.
In this manual, you will find:
- Where to adjust dimensions of the fixture?
- Where to set the category and category variant, and what system do we recommend when entering category variants?
- How to set up section in order to see multiple fixtures side by side when creating a planogram?
- How to set up a fixture i.e. for a freezer where the shelves are arranged vertically and you want to see the planogram from the top?
- How to create a fixture that uses a hanging system (hooks)?
- How to set custom properties for a fixture?
- How to change the number of shelves?
- Where to set the products to hang on the shelf?
- How to create pyramid-shaped fixture?
- How to create a blocker inside the fixture?
- How to set the fixture pictogram?
The fixture is edited in the Store Editor in four parts:
- Component tab - here is a preview of the fixture with the possibility of editing dimensions.
- Fixture Components tab - is used to edit other fixture components (shelves, blockers or pictograms).
- Fixture Properties tab - properties for the entire fixture, such as categories or shelves orientation are set here.
- Shelf / Blocker / Pictogram Properties tab - here you always edit the selected part of the fixture. The tab changes depending on which piece of the fixture you have selected in the Fixture Components tab. It can therefore be a shelf, a blocker or a pictogram.
Component
Here you can adjust dimensions of different parts of the fixture - set the width of the fixture, its depth, the height of the shelf, the height of the base and more. You can adjust the fixture as you wish.
Fixture Properties
In this tab, you can set properties related to the entire fixture. Frequently used properties will be described in the following section.
Category
You must set a category in order to create a planogram for the fixture.
Category Variant
The category variant is used to differentiate the number of modules in different stores. In a smaller store, you can have only one fixture for the Tea category, in larger stores you have 2 fixtures for this category. To distinguish planograms for these stores, it is advisable to set the category variant for a fixture in a smaller store 1/1. In the larger store, the variant 1/2 is set for the first fixture and 2/2 variant is set for the second fixture. Thanks to this designation, it will be possible to create the same planogram template for all stores with one module and to distinguish them from stores where two modules occur.
The same category variant means that the fixtures will share the same planogram template from which the planogram is generated.
If you do not fill in any variant of the category, all fixtures with the same category and no variant will share the same planogram template. We therefore recommend setting variants carefully from the beginning.
You can read more about category variants in the Category Variants manual.
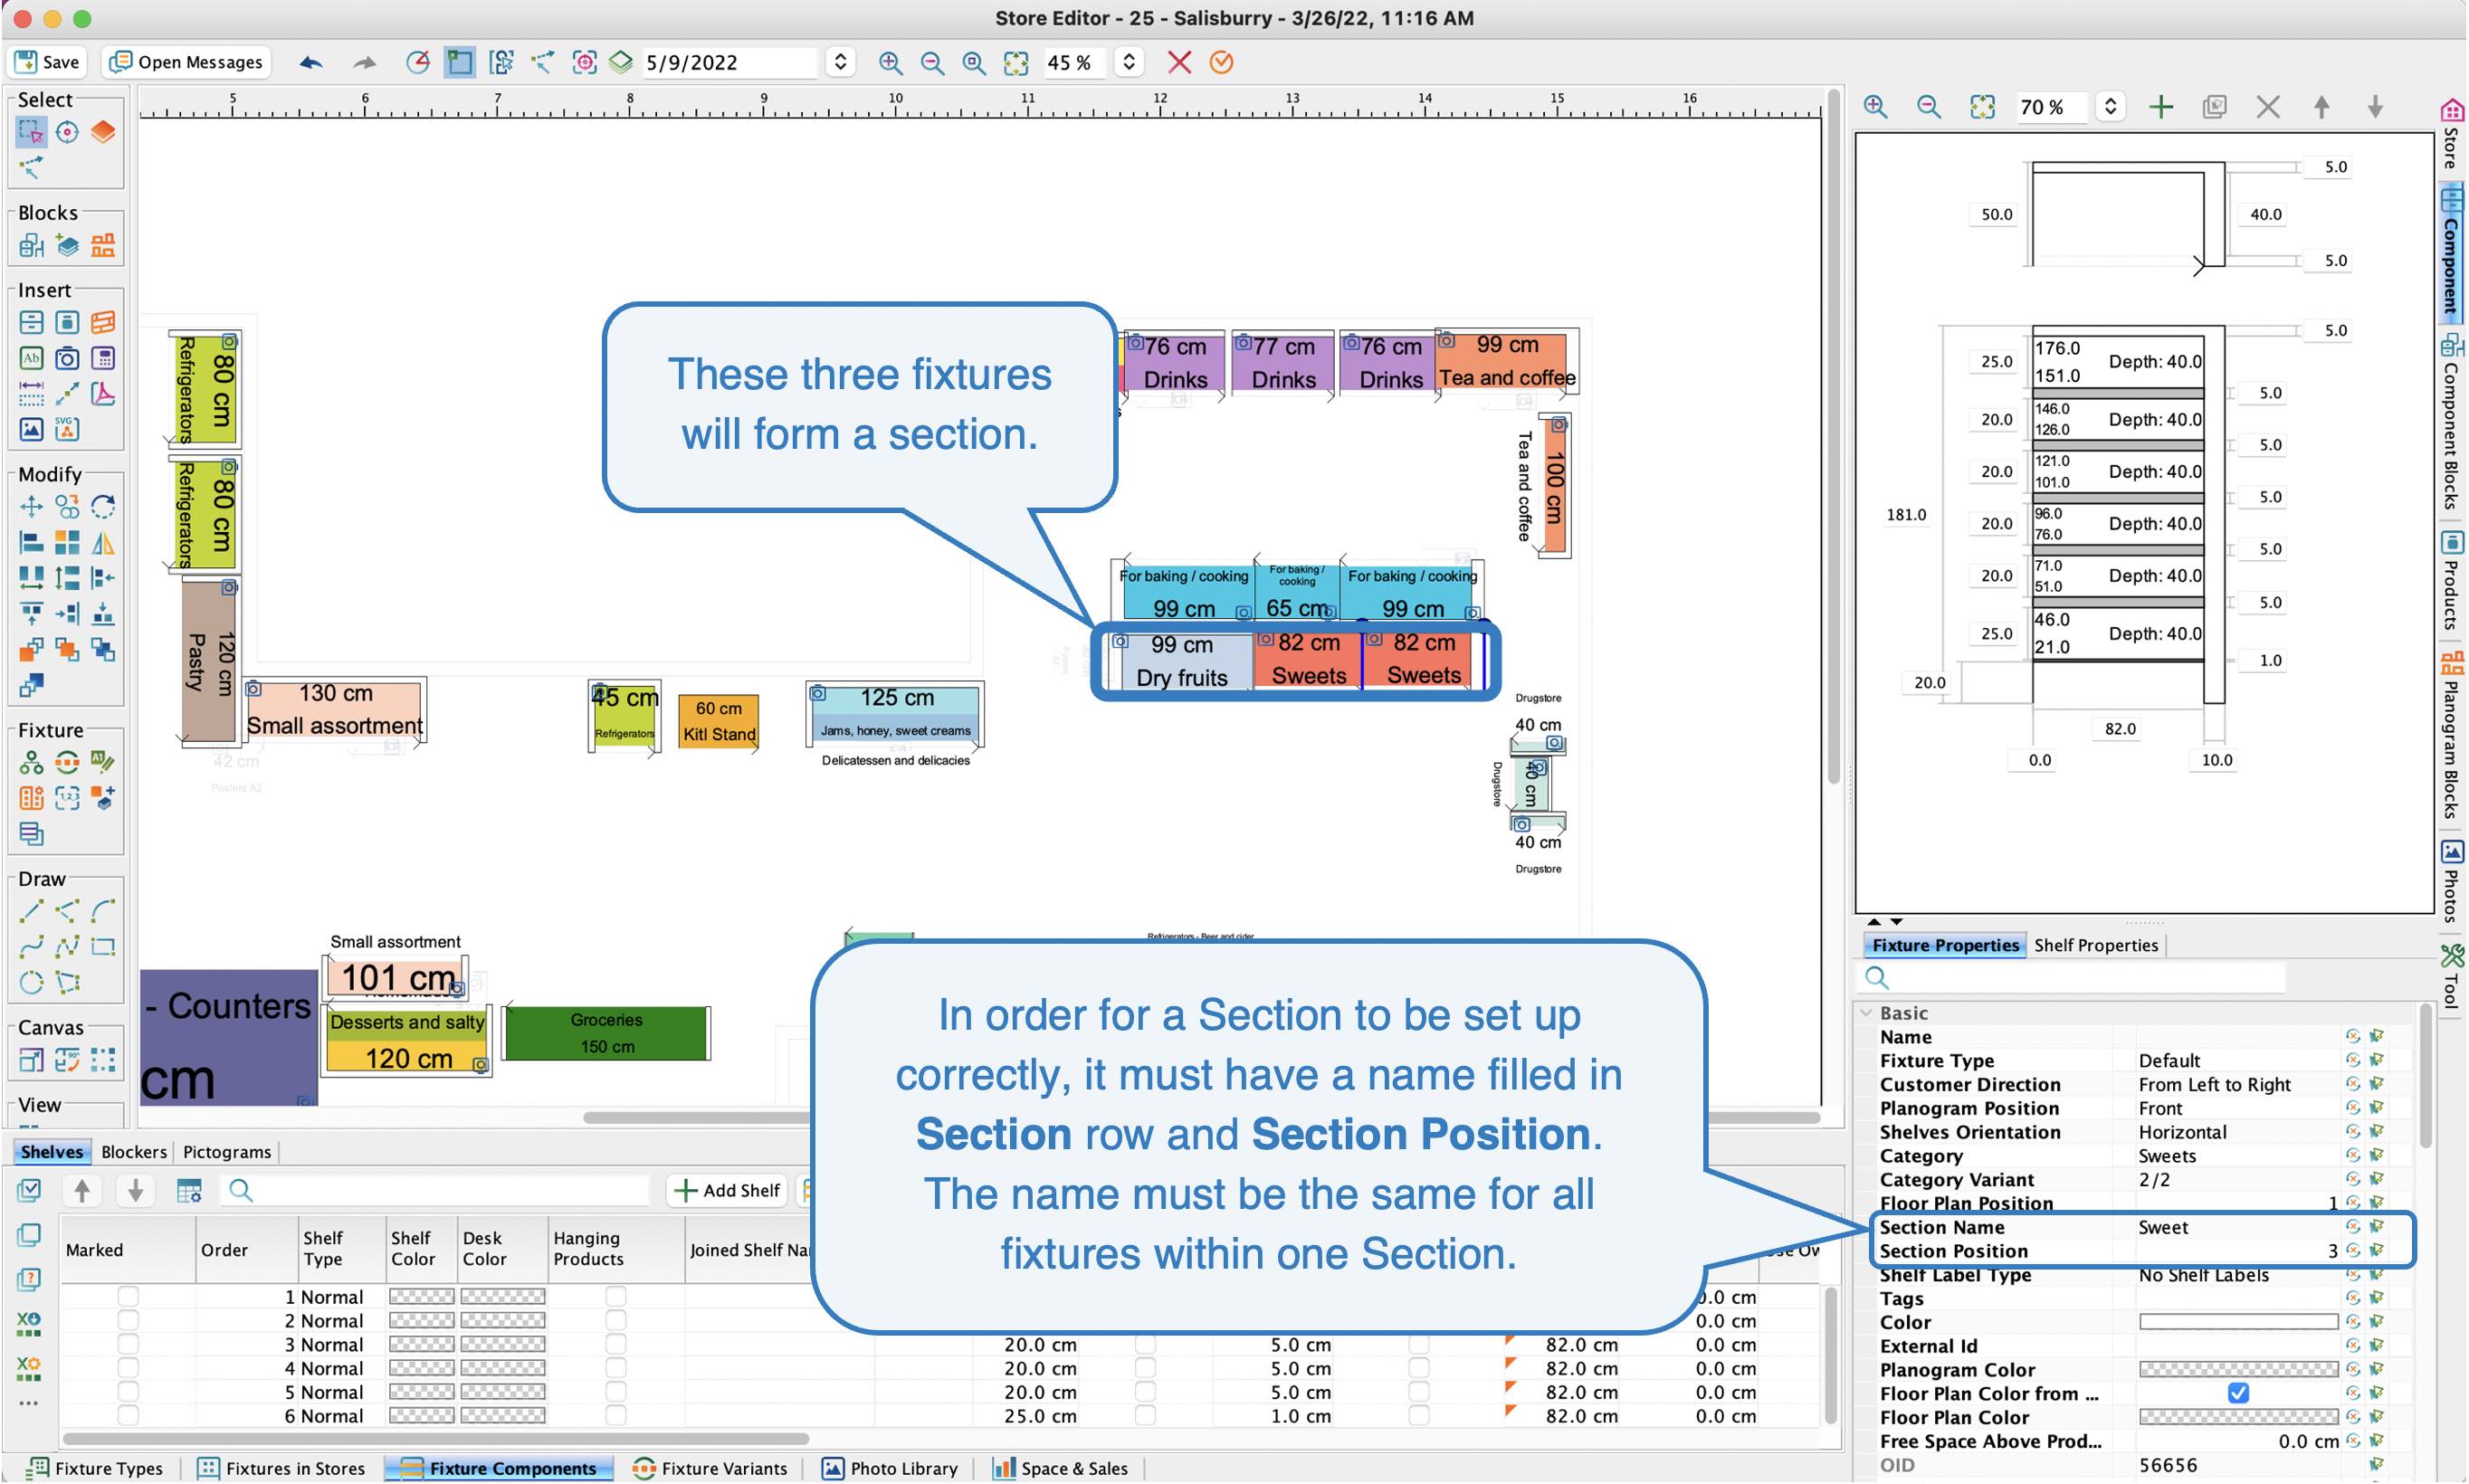
Section
It is the setting that is beneficial to use in case you would like to see more planograms in the Project Editor at the same time. To set up the Section in the Store Editor, set the shelves that are to be part of one section with the same name in the Section row.
 Section settings
In the Project Editor, you can turn on the Section preview and create a planogram for more fixtures at once. In some cases, this preview can help with orientation when working with multiple racks at once. Aditionally, it is possible to easily click through them directly in the preview.
You can find a more detailed description of this topic in the Section manual.
Customer Direction
Here you can set the direction in which you expect customers to move during their purchase. The default direction is set from left to right, which means that the products in the resulting planogram will also be arranged from left to right. If the customer direction is set from right to left, Quant will automatically mirror the planogram template. In the floor plan of the store, customer direction is indicated by a small arrow for each fixture.
The direction of the customer also affects the arrangement of section. If you set the first fixture in the section direction from right to left, the whole arrangement changes so that the first fixture is displayed on the right.
Planogram position
The position of the planogram is usually front. However, if you are working, for example, with fixtures for a freezer and you wish to set the vertical orientation of the shelves, you will want to see the planogram from the top. Thus, the position should be set as top.
Shelves Orientation
The orientation of shelves can be either horizontal or vertical. In most cases, the horizontal orientation of the shelves is used, which is set by default for each fixture. However, for fixtures such as freezers, the vertical orientation of the shelves will be used.
Notes
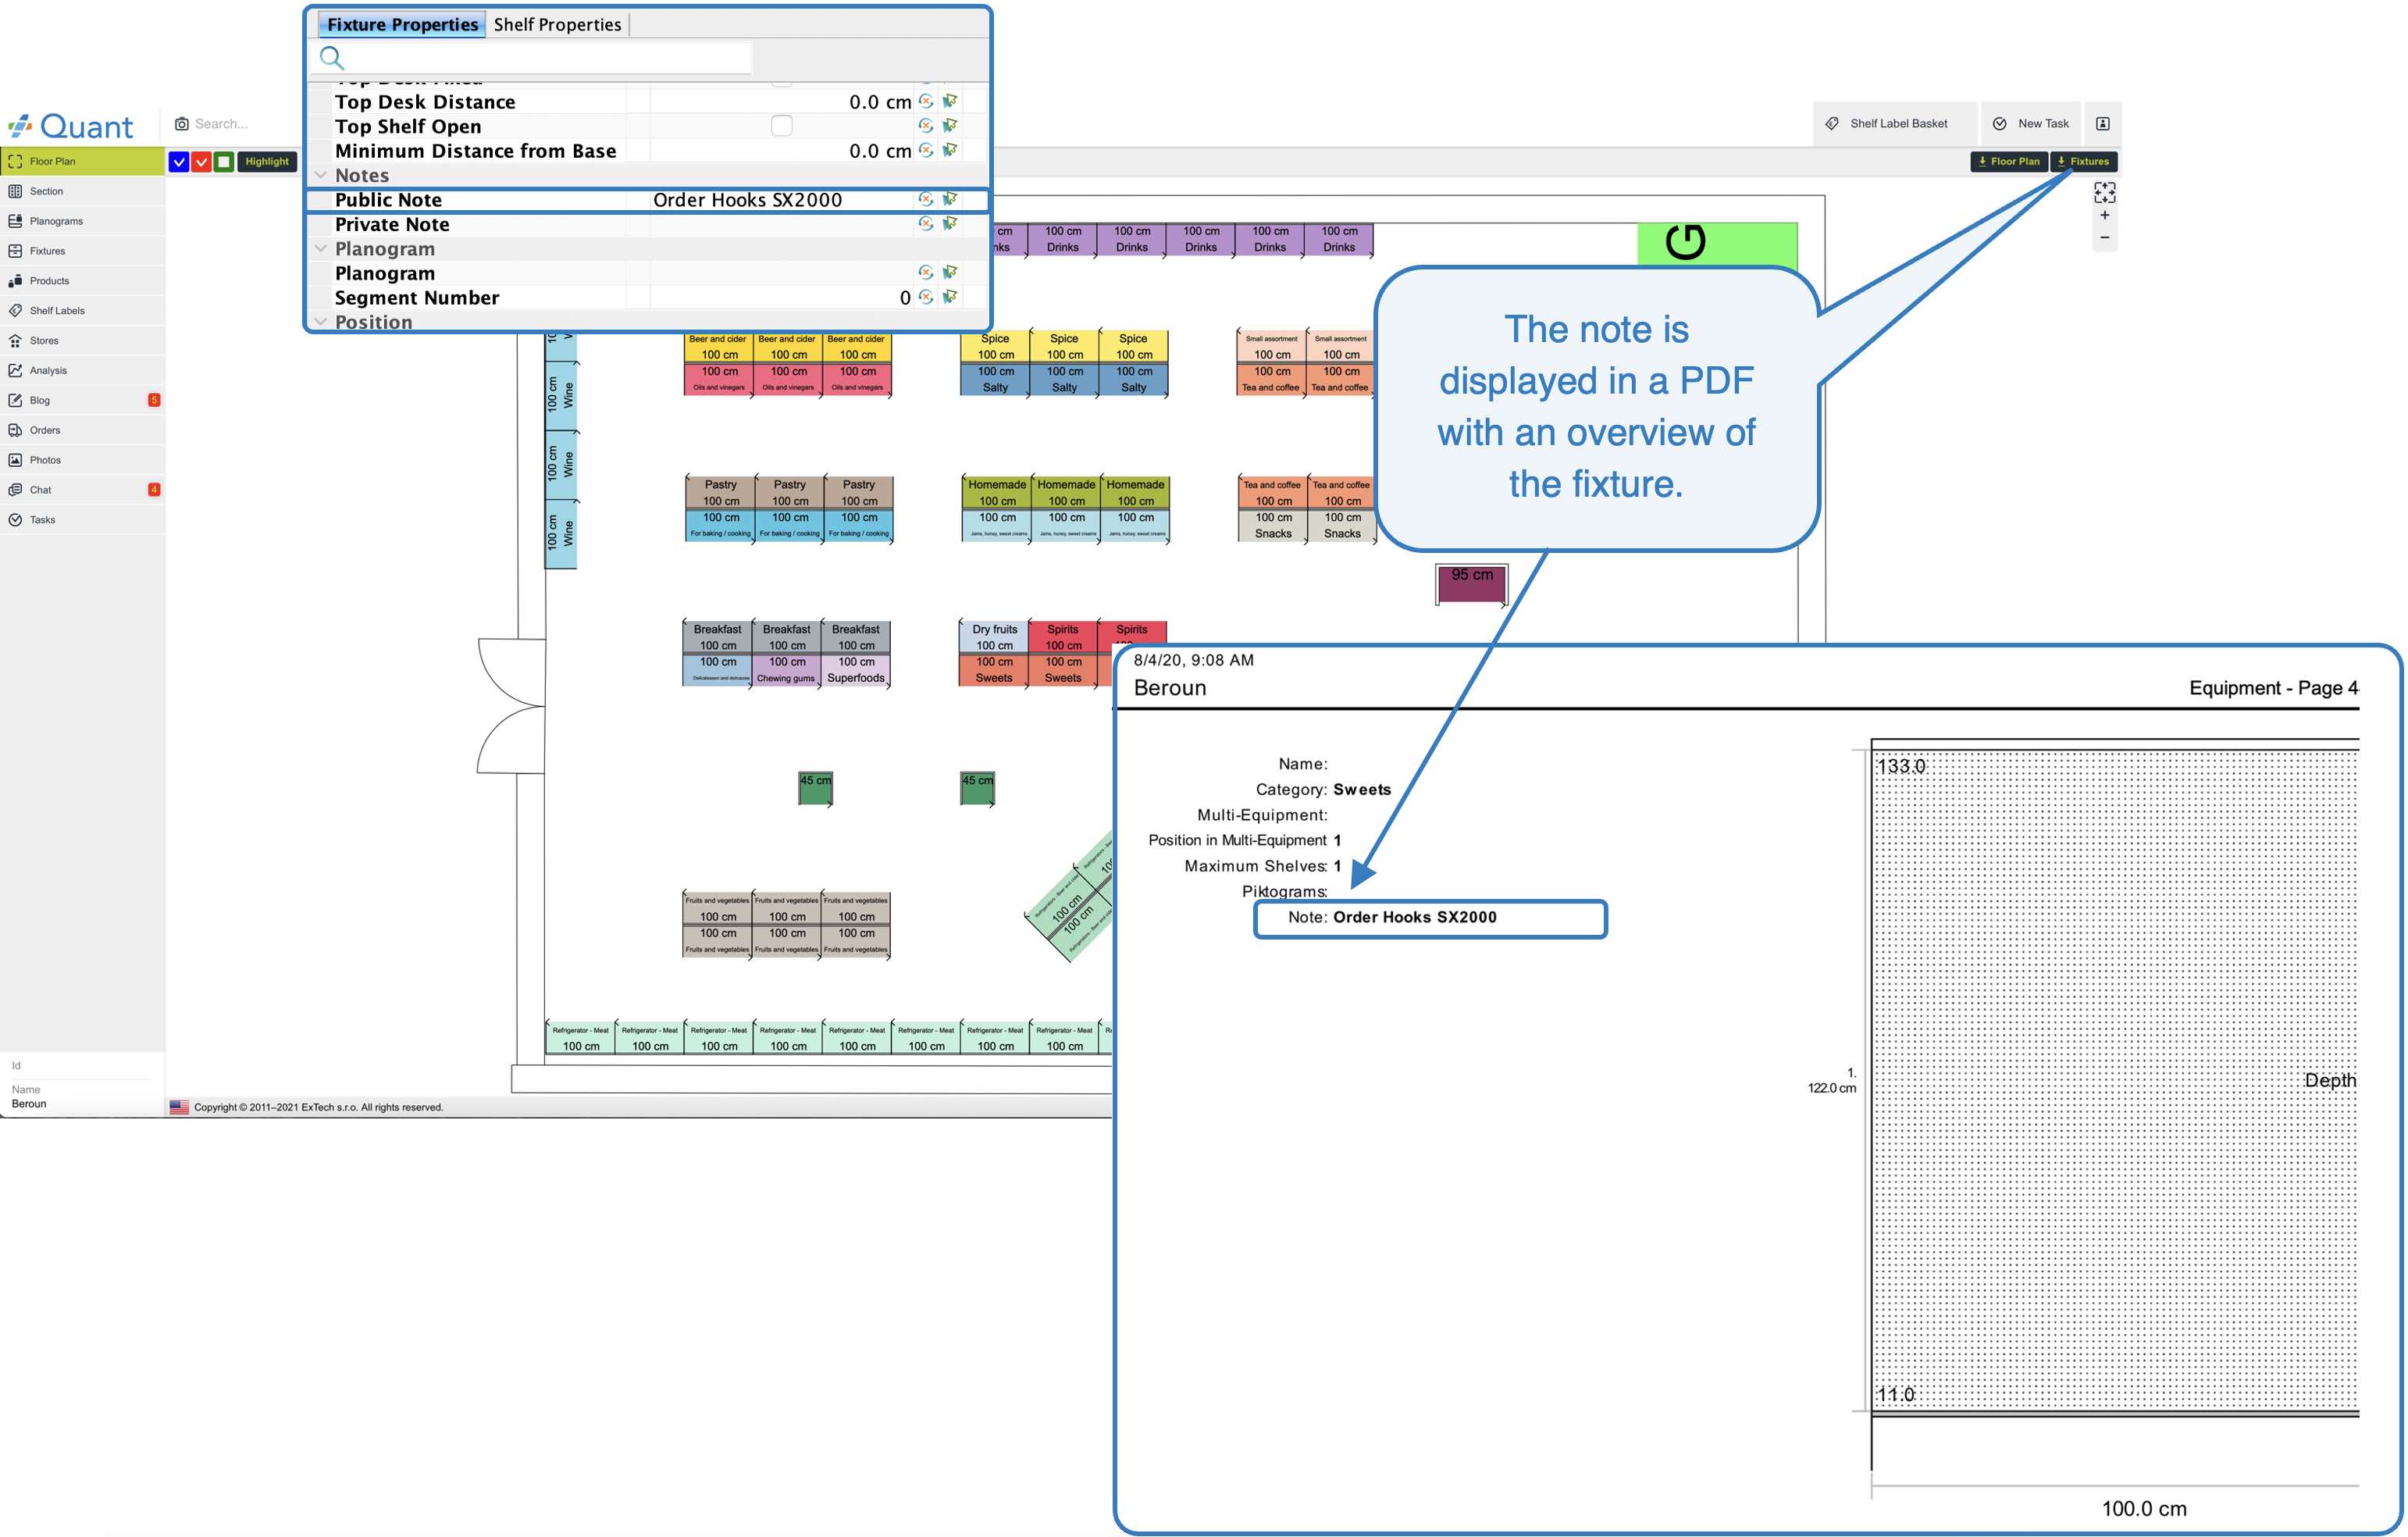
- The Public Note - It will be displayed in the PDF format when exporting the fixture.
- The Private Note - It is visible only in the Fixture Properties tab in Private Note.
 Public note
 Position
Position
- In this section, you can specify the exact position where the fixture should be located and the angle of rotation.
- Hanging check box - if you check this box, it means that the fixture should be hung on the wall.
Measurements
In Measurements, you can set fixture dimensions. However, all these dimensions can also be edited in the editable preview of the fixture in the Component tab.
Automatic Shelf Heights
They are used for dynamic positioning of shelves depending on the height of the inserted products.
You can find a description how to define a fixture with flexible shelves in Automatic Shelves Heights manual.
Custom properties
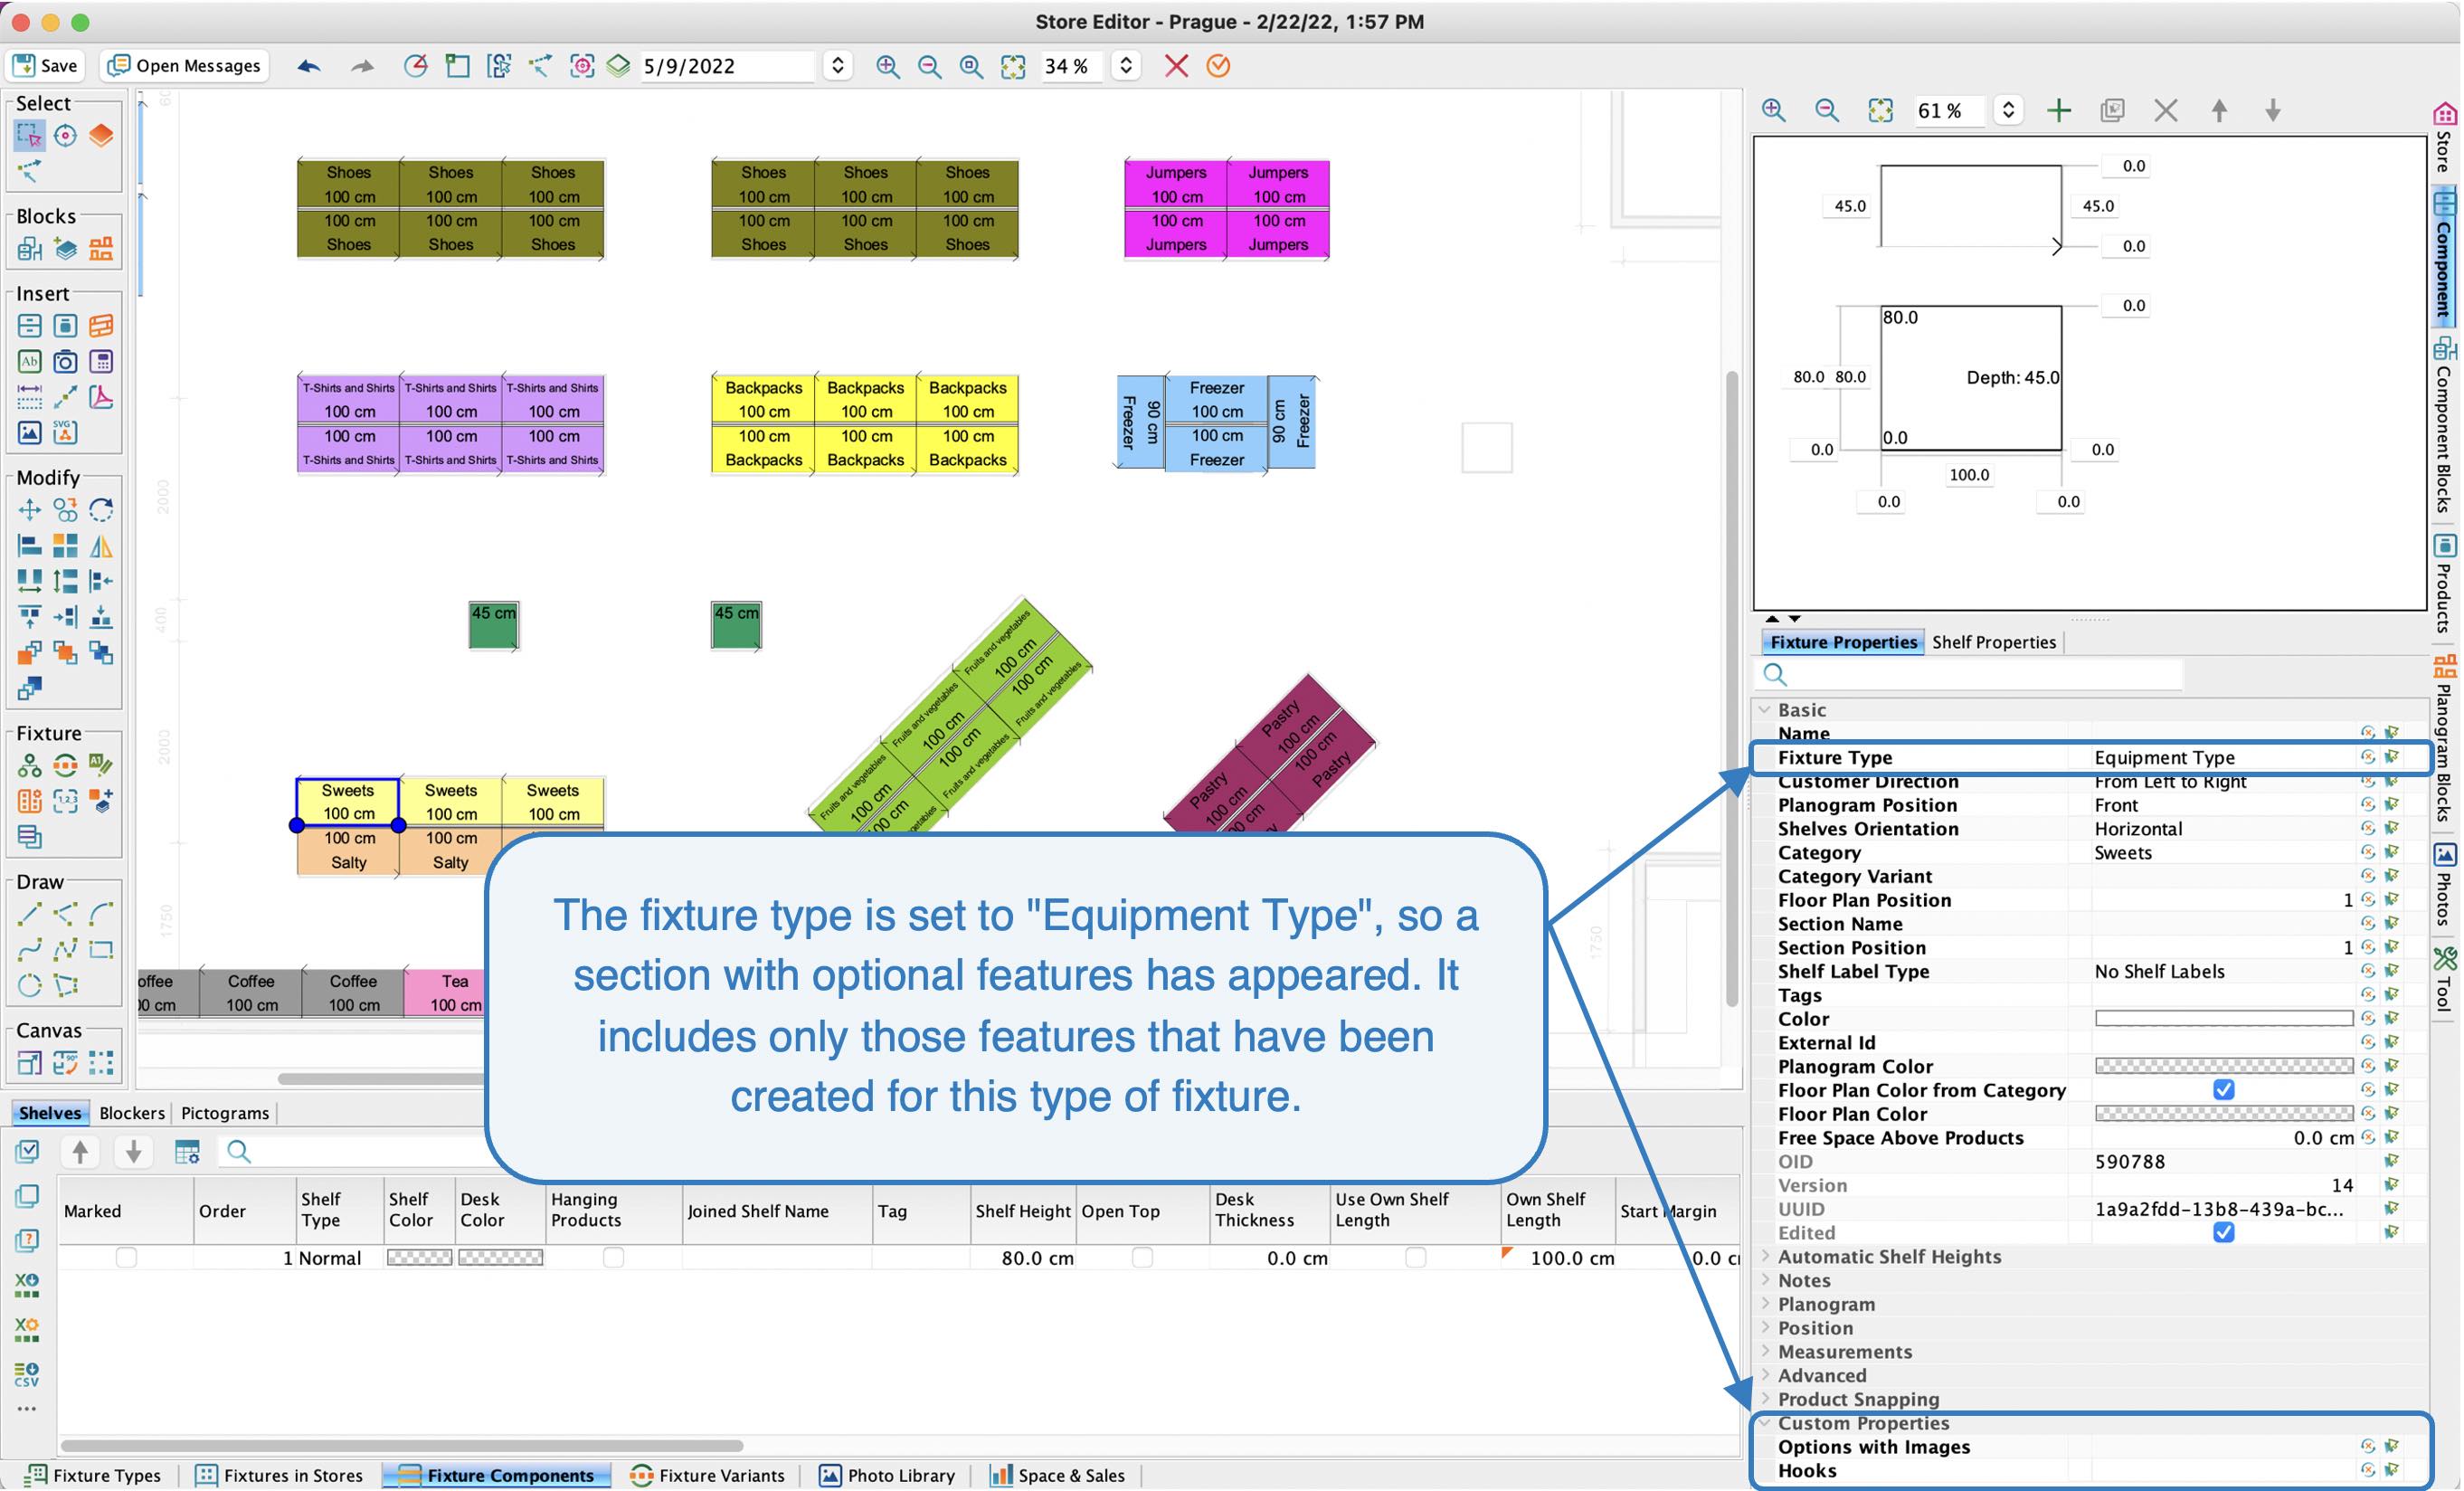 Fixture Type
Editing shelves
Editing shelves
There is a table with a list of all shelves in the Fixture Components / Shelves tab. Selecting the Shelves tab activates the Shelf Properties tab at the bottom right where you can edit the properties of the selected shelf.
How to change the number of shelves?
- Click on the Add Shelf button to add a new shelf.
- You can set the number of shelves in the fixture in bulk by clicking on the Create Shelves button.
- Click on the Remove button to delete the selected shelf.
How to change the order of the shelves?
If you have the shelves in the wrong order, just select the shelf you want to move and click on the arrow to move it up or down.
Settting Shelf Properties
In the Shelf Properties tab, you always set the properties for the selected shelf in the table. In this section, you can edit i.e. all possible shelf dimensions, set your own category or set hanging products for a given shelf. In the following section, some properties are described in more detail.
Hanging Products
Check this box to ensure that inserted products will be hung on the shelf and will not lie on the desk.
Open Top
This setting is used for a fixture which is not limited from the top. The top shelf must then be set to be Open Top so that the products can be inserted to any height.
Use Own Category
If there is 1 shelf within one fixture, which should have a different category than the rest of the fixture, you need to set a different category in the Own Category row for selected shelf.
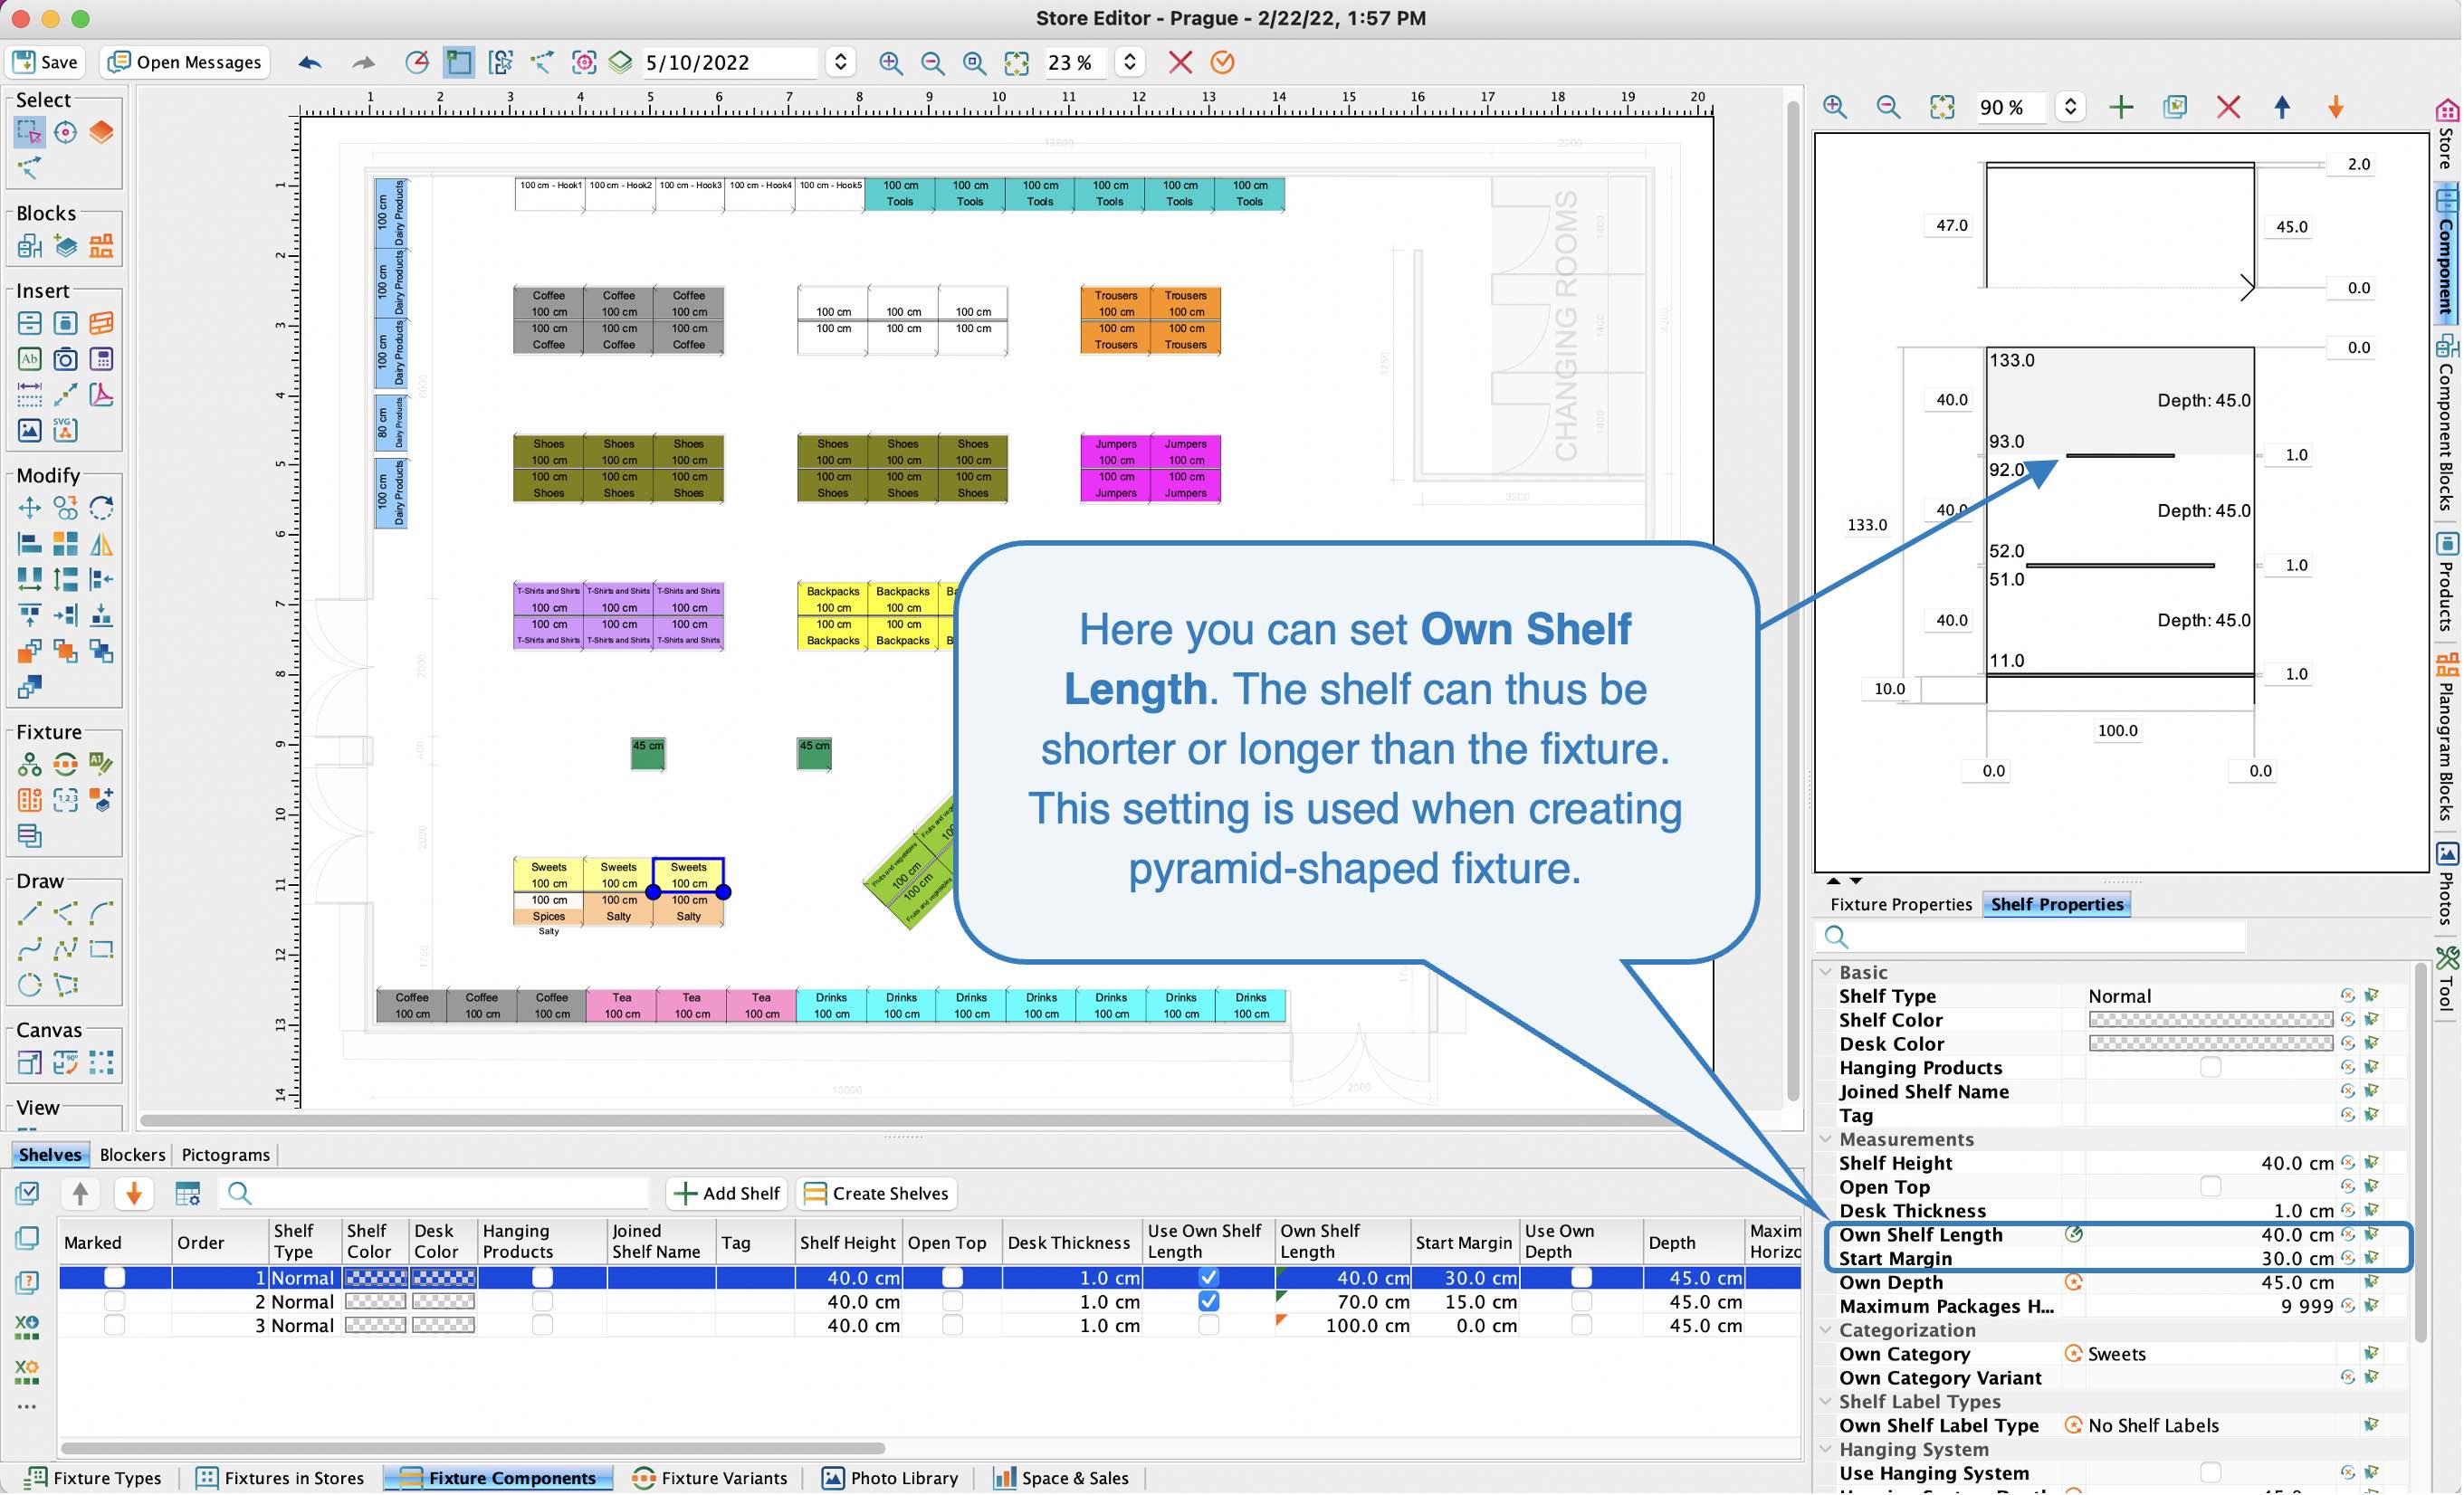
Own Length
This setting is used for fixtures for which you want a different shelf width than the length of the fixture itself. As an example may be pyramid-shaped fixture. For the shelf for which you want to set own width, you must fill in a different value into Own Shelf Length line. You can also set the Start Margin to center the shelf.
Hanging System
If you need to plan the fixture on which the products will be hung, you must check the Use Hanging System check box. You can then set other properties for the hanging system in the Hanging System section. For example, you can set Slat Height or Slat Distance.
Hanging system is described more in detail in the Hanging system manual.
 Own Shelf Length Editing Blockers
You can create new blockers in the fixture.
In the Fixtures Components / Blockers tab, create a new blocker by clicking on the New button. In this tab, you will see a list of all existing blockers within the selected fixture in the table.
Selecting the Fixtures Components / Blockers tab activates the Blocker Properties tab on the right, where you can edit the properties in the table of the selected blocker.
Setting Blocker Properties
In the Blocker Properties tab, you always edit the properties of the blocker which you have selected in the table.
First shelf / Last shelf
Here you set which shelves the blocker should be placed between. In our case, the blocker is between the second and the fourth shelf.
Width
This property specifies the width of the blocker.
Distance from Left
Here you set how many cm the blocker should be from the left panel of the fixture: in our case, it is 50 cm. That means it will be located about halfway through the fixture.
Block Products
- Each blocker is set to block products by default. Therefore, when creating a planogram, products will not be able to pass through the blocker.
- If you uncheck the box, the blocker will not block products and products will be able to pass through the blocker.
Pictogram settings
You can set a pictogram for each fixture, which you create in Quant Explorer in the Fixtures / Pictogram Types tab.
Pictograms for the fixtures are set in the Fixtures Components / Pictograms tab. When you create a new pictogram, the Pictogram Properties tab on the right is activated where you can assign the appropriate pictogram to the fixture.