Block Editation
You can set various properties for the inserted block, such as the number of placed pieces in width, height, its position, rotation and more. These adjustments will be described in this manual.
In this manual you will learn:
- How to change the default settings of the Block tab?
- Where to change the rotation of the product in the planogram?
- How to change the number of pieces placed in the planogram?
- How to adjust the block margins so that there is a gap between the products in the planogram?
- Where to adjust dimensions of the package so that these dimensions are valid for one specific planogram template?
- How to set the planogram to not show the package picture?
- How to nest the products behind or above?
You can edit the block (= inserted product into the template) in the right part of the Project Editor in the Block tab.
- Double-click on the Block in the template
- Select the Block tab
You always edit the block that is selected in the template. If no block is selected, the Block tab will be empty.
The block tab consists of three parts:
1. Block Properties
- It is used to edit the properties of the selected block.
- This part is divided into several subsections.
2. Preview
- A preview of the product which creates the selected block.
3. Nested Products
- Table in which the list of nested products of the selected block appears.
Default setting of the Block tab
In the Block tab, you can set which default properties the block should contain when it is newly added to the template. If you reset a property each time you insert a block into a template, it is better to change the default settings of the block. Thus, each newly inserted block will have the default properties already set.
How to change the default settings of the Block tab?
- In the top bar in Quant, select Project → Properties
- In the new window, select the Block tab
- Change the default settings according to your requirements
- Click on Ok
We want the maximum possible number of pieces to be placed in the template every time, not just one piece. All you have to do is set the maximum number of packages in width, eg 100, in the Project properties. When inserting each new product into the template, the highest possible number of products is placed (between 1 - 100).
The following part of the manual describes the individual properties that you can set in the Block tab.
Priority
Priority - is important when not all the products fit on one shelf. Quant will prefer to select a product with Priority 1 over products with a higher number (order).
Adjusted Level - is used only for store-specific planograms. Check Use Adjusted Level and select a variation in the Adjusted Level row.
Space Filler - is used for store-specific planograms, where the number of products placed in width is calculated according to sales. For products with high sales, it is advisable to check this box to fill the shelf space if there is empty space left in the shelf (some products will not be placed because they have no sales).
Package
In this section, you can change the default package, product position, rotation and set other properties.
Min Packages and Max Packages
The number of pieces to be placed in the planogram is set here. Quant places the maximum possible number of products.
Setting the number of packages
Block Margins
Adjusting Block Margins allows you to indent products from other products or from planogram walls.
Adjusted Measurements
Adjusted Measurements of Package can be used for products that have changeable packaging.
An example of such a product may be coffee, the packaging of which is larger than the contents. The top of the package is easy to handle and bend. In the picture below, we want to place a 22 cm high package of coffee in the planogram, but the shelf is only 20 cm.
Adjustement of package size
We can make the package smaller, so we will adjust the dimensions to 20 cm and the product will be placed.
Product placement
Without Pictures
This setting is used in case you do not want the image of the package to be seen in the planogram.
Here, you can set the properties of the symbolic package, such as the background image, the text you want to see inside the shape, the background color, and the border color.
You can set the property that should be displayed in the planogram in the menu: Project → Properties → Planogram.
Nesting
Nesting is used for products that can be folded into each other or behind each other and thus it saves the shelf space (eg flower pots, bowls).
Nesting of products
Two situations can occur during nesting:
- nesting of the same product
- nesting of a different product
How to nest THE SAME PRODUCTS?
- Select a block in the template
- In the Block tab, in the Nesting section, set the type of nesting
In the Max Packages section, set a larger number in the Height row. If you have a maximum height of 1 by default, Quant will always place one product, regardless of how many would fit there if the nesting was set.
How to nest DIFFERENT PRODUCTS?
- Insert a product which will be placed lowest (when Nesting Top). In the Nest Back case, it will be placed the most front in the template.
- From the table with products, select the product to be nested and move it to the template where the first product is located.
- A context menu will appear where you can select the Nest option.
- The newly added product appears in the table with nested products.
- You can change the type of nesting (nest top, nest back) in the Block tab in the Nesting section. You can edit other properties in the table with nested products.
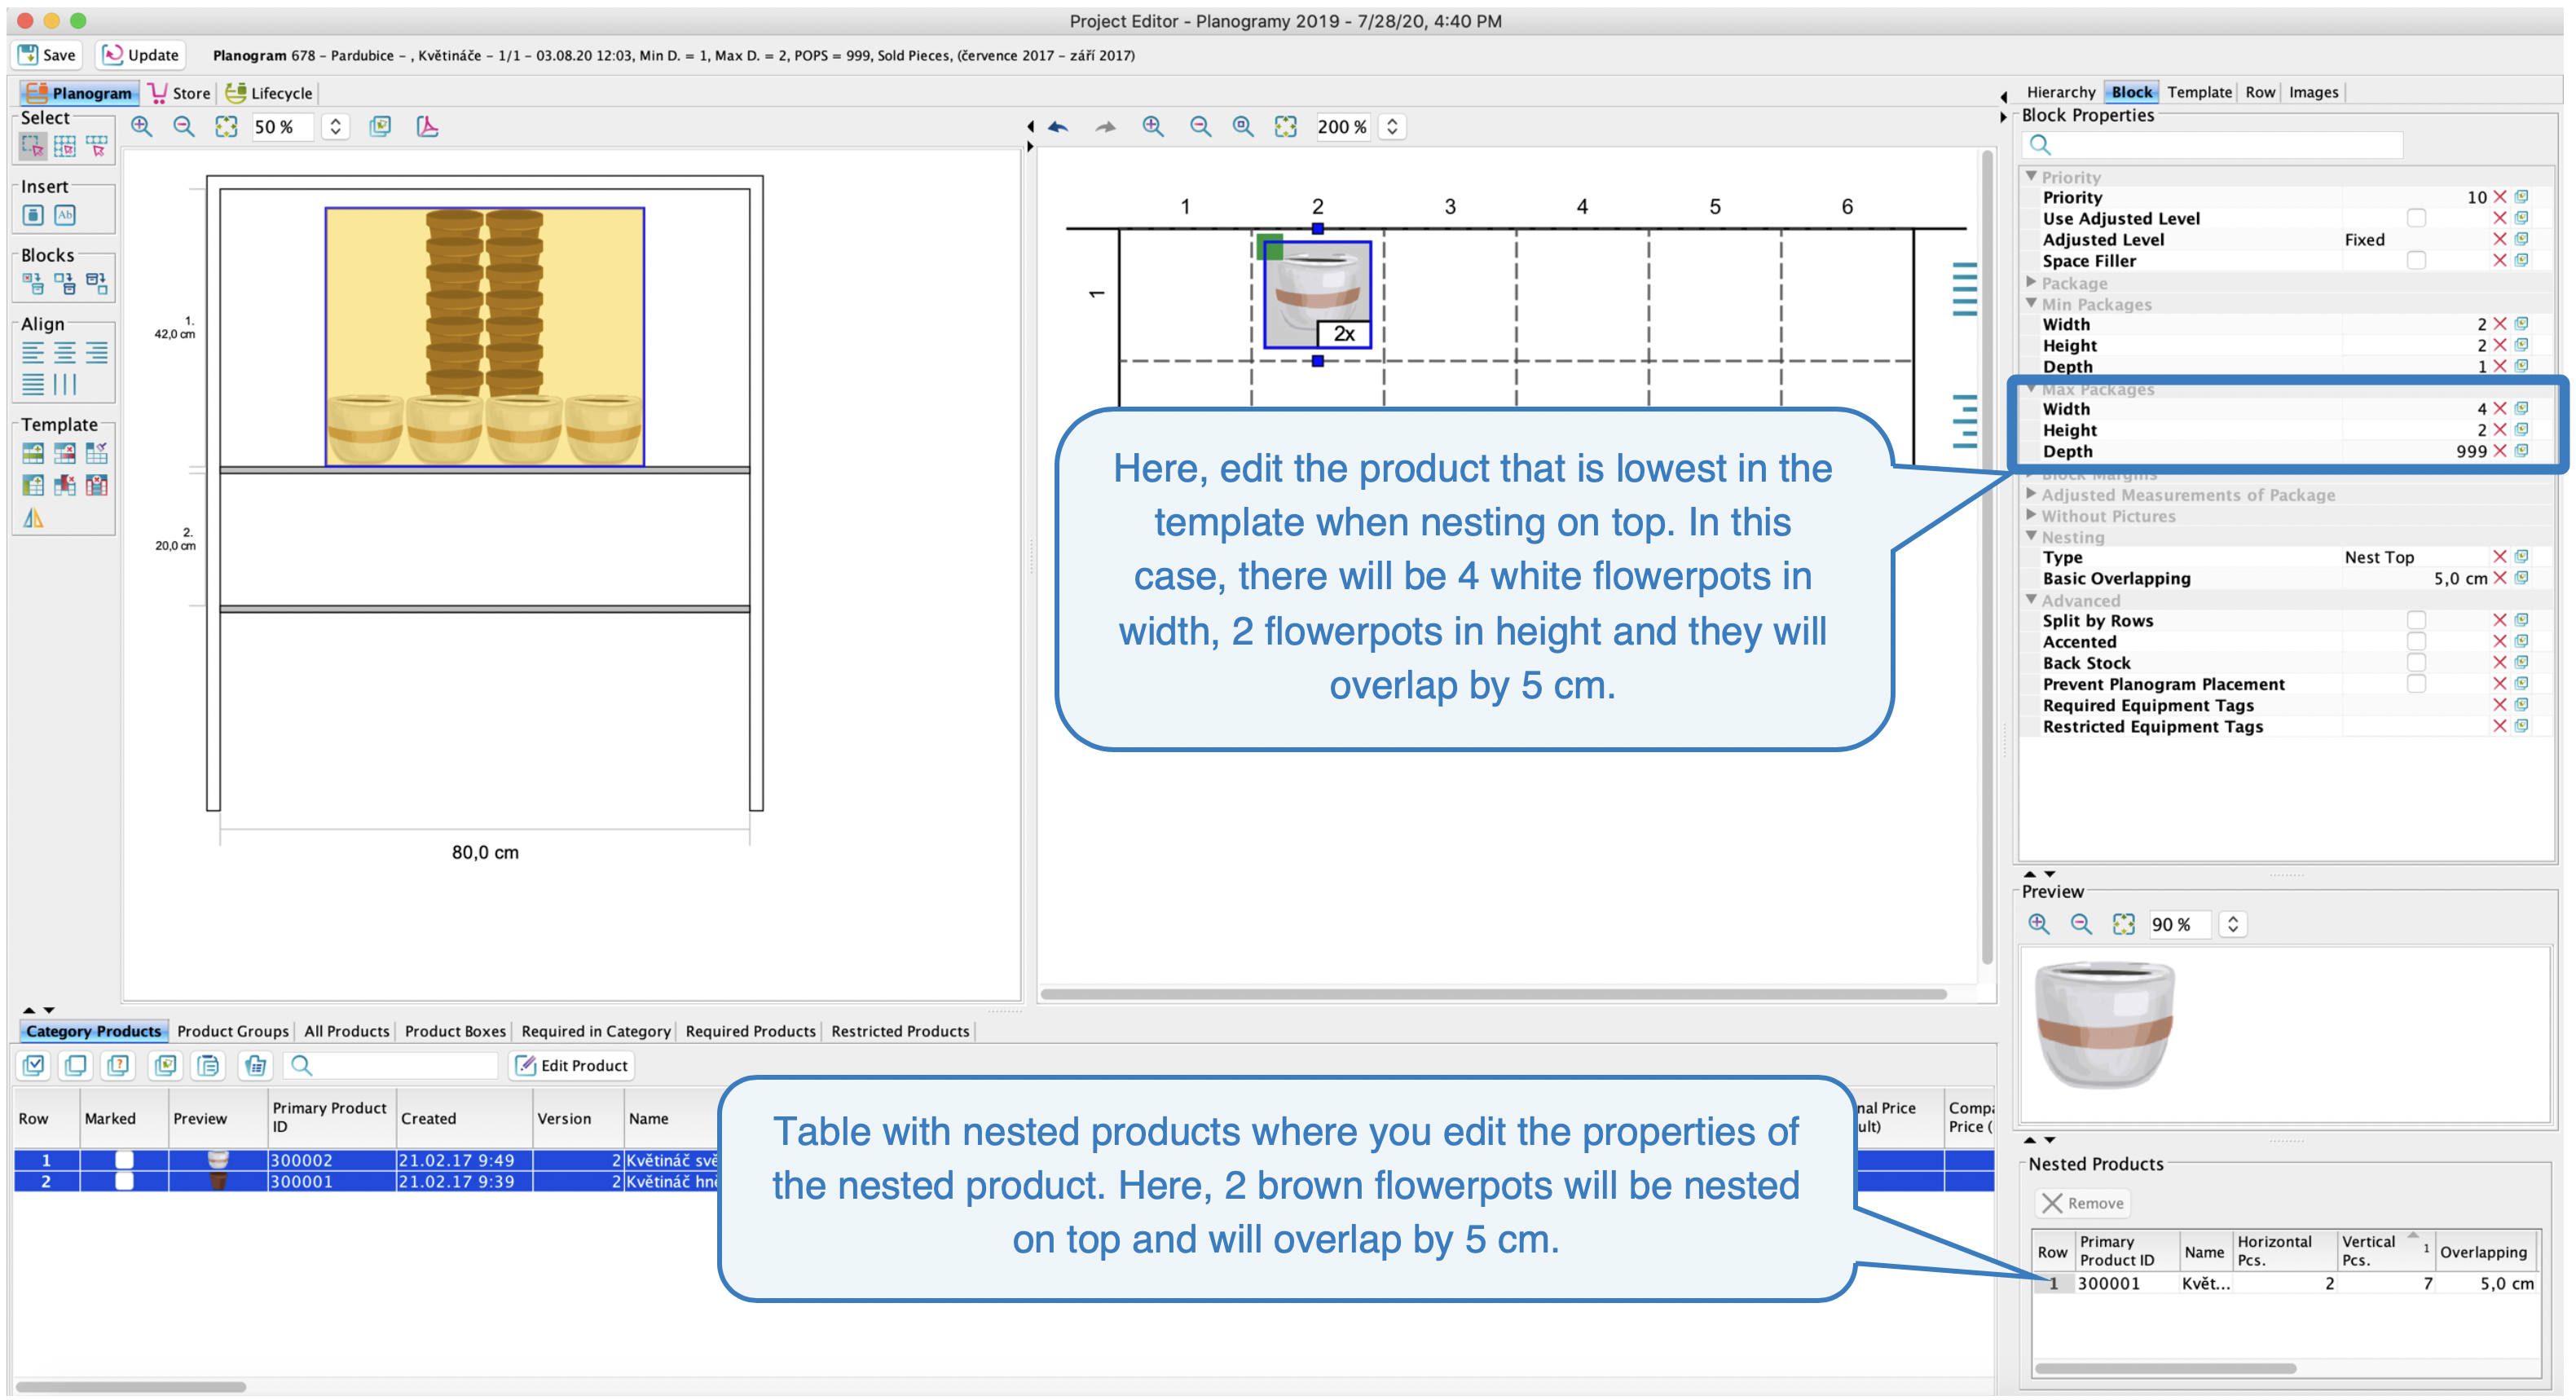 Nesting settings for different products
Advanced
Advanced
Advanced features include:
Split by Rows
Check the box if you want to divide the product vertically into several shelves in the planogram.
Accented
A border is created around the product.
Back Stock
A product which must be placed at least in a back stock if it does not fit in the planogram. This product will then appear as a required non-placed product in the list of products.
Prevent Planogram Placement
If you decide that you do not want to place the product in the planogram, even though Quant placed because it has high sales, check this box. In combination with the Back Stock option, it is possible to include in the planogram products that are to be placed only in the back stock.
These tags allow you to disable the placement of a block in a store-specific planogram.
You will find more detailed information about equipment tags settings in the Equipment Tags manual.